Monday, September 17, 2012

Food Review: Taro Mochi (★ ★ ☆ ☆ ☆)

Brother-in-law and sister enjoying the view.
So this week, I'm actually on vacation.  In Lake Tahoe to be exact.  

Okay, so maybe not in Lake Tahoe.  More like near Lake Tahoe. I can walk down the trail about a quarter mile to it if I want to jump in...and I will, tomorrow.  When I go kayaking!!!!

I've been wanting to do a week of food reviews and figured this would be as good a time as any.  

I love food.  Hence, I have a baking blog.  I enjoy the cooking part, but mostly I enjoy the eating.  I'm also not afraid to try new things.  I think this is the one area in my life where I think I'm pretty fearless.  

Rollercoasters?  No, thank you.  Tried them.  And still, no thank you.
Doing pretty much anything new or unfamiliar fills me with butterflies.

But food.
I get super excited before trying something new.  
It could be the thing my tastebuds never-knew-they-always-wanted, for all I know! 

Now that I've talked myself up, I feel the need for disclaimer.  I'm excited if it's an actual food somebody eats on a regular basis or enjoys.  No, I will not eat that worm you just dug up out of the ground.  Gross, k?

So this week, I will be posting a new review everyday about something interesting that I've tried.  My hope is that you will go out and try something new yourself.  If I can try a roller coaster that one time when I was nine, then you can take a spoonful of Vegemite (oh, it's coming).  

And my personal goal? To keep it under 200 words. Gulp.  
I'm on vacation people!  But can I do it?  That is the question..

-----
My first experience with mochi was at a sample booth at Trader Joe’s.  They were giving out green tea mochi ice cream (ice cream encased in mochi).  And, I have to say I am not a fan. 

I thought maybe it was the green tea flavor that was off putting, but I tried the more people friendly “strawberry” and still felt the same.  It was very bland like something was missing.  I couldn’t put my finger on it, but it’s not something I would waste my precious calories on again.

In case you are unfamiliar, mochi is a Japanese gummy substance made out of glutinous rice that has been pounded into a paste.  It has a very subdued flavor, which makes it easy to add to all kinds of dishes.  

My second introduction to mochi was much better.  Self serve frozen yogurt is huge here in California.  And small pieces of mochi are almost always offered as toppings.  

I tried some and to my surprise I really liked it.  The mochi was an accent to the yogurt instead of the main attraction.  As far as flavor balance goes, I thought this was a much better arrangement. 

And it’s like having gummy bears that don’t freeze in your ice cream.

Hear that?
They DON’T freeze.

The six year old girl in me freaked out when I made this discovery.  

So when I saw these mochi cookies at World Market, I thought to myself “Hey, I like Taro (a starchy plant that tastes kinda like a sugar cookie) and mochi has been good to me lately.  Why not?”

All I can say is that these were not gross.
Actually, I couldn't stop saying it.
“Well, they’re not gross.”
“Hey sister, try this.  It may not be the best thing you’ve ever tried, but you won’t be able to tell me that it’s gross.”

These cookies (or whatever they were) were probably one of the most intriguing things I've ever eaten.  Soft gumminess on the outside, pasty gooeyness on the inside. 

One moment my tastebuds were like "oh, yum" and the next "oh, um hey.  uh, no offense, but that was kinda weird."

It took me awhile to figure out how to even describe them, but this is what I came up with:

"A gummy sugar cookie biscuit.  The inside maintains at once the texture of sugar paste and yet also the graininess of a crushed up cookie."

How this is possible?  Please don't ask me.  I haven't the faintest clue.   
I wouldn't recommend you go out and buy these, but I wouldn't caution you to steer clear either.  If you have an appetite for adventure (get it? get it?) then sure head down to your nearest import store and pick some up.

If you do, please please please please please let me know what kind of dance your tastebuds did.
So now the moment of truth.
How did I do?

Word Count: 482

I. Have. A. Problem.

Eh, so sue me.

Tomorrow you get -282 words.  Have fun looking at pictures!  


Thursday, September 13, 2012

Cinnamon Roll "Middles" (★ ★ ★ ☆ ☆)

I have a confession.

There was not one ounce of creativity on my part that went into this weeks concoction.  

In fact, these are exact replicas of the Snickerdoodle Donut Muffins that were posted on The Domestic Rebel earlier this year.  

I never intended to change the name...
or even post about them at all.  

I made them on a whim last week when the bestie and I decided to have a BFF day: starting with these and ending with a Moulin Rouge sing-a-long at our local retro theatre, complete with white handkerchief props that were to be waved during I'm sure you can guess what "word" in that pivotal Madonna song.  

These had been in the back of my head since I read that after our dear blogger made these, her family started throwing hissy fits if they were not awaken every Saturday morning by the aroma of piping hot, cinnamon-y goodness wafting through their bedroom doors.  Granted, if she was a mom and these were her kids, I'd say smack some sense into them before it's to late!  But she's the daughter in this situation and these are her parents and brother we are talking about...so it's kind of funny. 

Wouldn't you wonder about a snack that made grown men cry and mothers demand breakfast from their daughters?  

Well, I can tell you that these were pretty. darn. good.  

...and ridiculously easy.  

I feel a little bit ashamed even blogging about it.  

In fact, I was avoiding doing so.  

The first time I made them, I had no camera ready.  My nails were not freshly coiffed.  And the counter was most certainly not cleared.  

I behaved as I would normally on a Saturday morning. 

Fresh out of bed,
Hair mussed,
No make up,
PJs.  

As it should be. 

But after eating them....  game changer.

They taste exactly like the gooey inside of a cinnamon roll.  The middles have always been my favorite part!  How did I discover a way to make cinnamon roll goodness without the dry and crunchy outer layer?!?!  

Okay, reality check.  Once again - not my idea.  Total plagiarism going on here.  

And had this recipe been written in simpler terms, I could have "pinned" it to my Pinterest board and considered my duty to the world - complete.

But no, the directions were so full of exact detail that I had to read each direction four times to thoroughly visualize what I was actually supposed to do.  I didn't go to business school to become a Geometrist, okay! It hurts too much.  

I've always appreciated when bloggers take the time to illustrate each step.  A picture is worth a thousand words, right?  Well, I don't really want to read a thousand words.  I just want clear, concise instructions on how to slice a can of crescent rolls.

So that's what I did for you.  Because you should be able to make these...and give your family addictions...without having your brain explode.

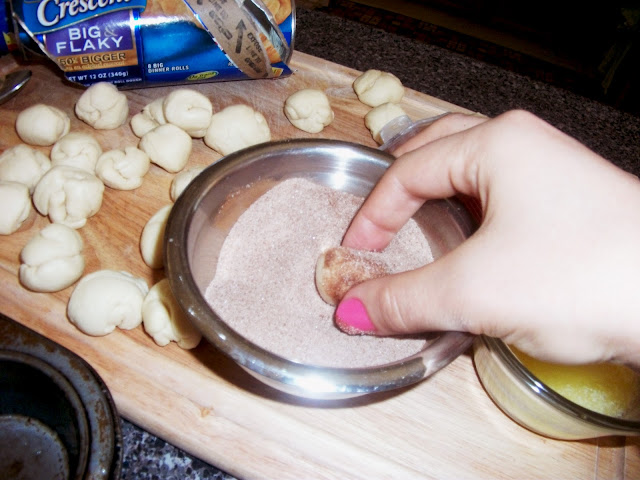
I give you: Cinnamon Roll "Middles:" A Picture Diary.

*Disclaimer: If some of these photos should insult your intelligence please remember I am an equal opportunist baker and cinnamon roll "middles" should to be enjoyed by all regardless of IQ or political affiliation. Thank you.

---------------------------------
Cinnamon Roll "Middles"
Basically Snickerdoodle Donut Muffins by The Domestic Rebel.  But they taste more like cinnamon rolls to me. 

1 Can of Crescent Rolls (Brand/Size doesn't matter)
3 Tbsp Melted Butter
1/2 Cup Sugar
1 Tbsp Cinnamon


1) Preheat oven to 375F degrees.
2) Grease a muffin pan with cooking spray or butter.


3) Roll out dough and separate into 2 sections.  There are 8 triangular pieces (or crescent rolls) per 
    can.  These triangles are attached two by two into rectangular sheets.  There are 4 of these sheets per 
    can. Arrange the dough so there are 2 sections of 2 sheets stacked on top of each other.
4) Cut the stacks in half down the middle so now you have 4 smaller rectangle stacks.
5) Pinch the edges and any perforations on each stack together so the 2 layers become connected. 


6) Cut each of the 4 sections into 4 strips lengthwise.
7) Then cut these strips crosswise to create 8 tiny rectangles from each section.  There should now be 
     32 pieces in total.
8) Roll each section into a ball.


9) Melt 3 Tbsp butter in microwave proof bowl.
10) Measure out 1/2 cup sugar and 1 Tbsp cinnamon and mix thoroughly in a small container.  


11) Coat each rounded piece in butter.  If you have a pastry brush you can use that to help cut out some 
      calories or just dunk the whole thing into the butter dish.  


12) After coating in butter, immediately toss each dough ball into the cinnamon-sugar mixture.  Toss
      the heck out of it.  The more cinnamon-sugary goodness on each piece, the better.


13) Place 4 pieces into each muffin cup, stacking them on top of each other.  Lightly pinch the pieces
       together to help them remain in place and not fall apart after they've been cooked.
14) Fill any empty muffin cups with a little bit of water.
15) Bake for 8-9 minutes.  They are done when the tops no longer look doughy.
16) Let the rolls cool in the pan for a minute before removing.  Since these are in pieces that may not be
      stuck together well, you can flip the muffin pan upside down on a cooling rack to get them out.

And Presto Chango - you have dangerously easy, mega delicious Cinnamon Roll Middles.

And what would cinnamon rolls be without a glass of milk? (Or a shameless plug for The Muppets? How cute is this glass?????)

I totally have a thing for Miss Piggy.  I love her unwavering self confidence.  She, without a doubt, believes she is the most beautiful thing to walk the planet.  I mean, let's face it.  She is a fat pig. It's magnificently inspiring.  Plus, she and Kermit are only like one of Hollywood's most awesome couples!

Okay, back to the task at hand.  Make these.  They are easy.  I took pictures for you.  And they are super yummy. Cinnamon "middles" can be your new favorite Saturday morning snack.
Step aside muffin "tops."
(The baked kind.  Probably not the ones around your hips.  Boo.)


Thursday, September 6, 2012

Cookie Dough Fudge: Take Two (★ ★ ★ ☆ ☆)

I live life on the edge.

I'm not talking about bungee jumping over a volcano in Chile,

Or painting the town red till four in the morning.

I live by a different edge.  

The kind of edge that forces you to audition for an opera class even though you've never sung opera in your life and you were, frankly, in the class by complete accident.  It's the kind of edge that compels you to try Vegemite because, hey, twenty-two million Aussies can't be wrong (right?), but it's actually the worst substance that will ever hit your tongue.

This is the edge that follows me through life.  Usually, it's only my fears that it makes me face.  But once in awhile it drives me to do something a little more troubling - dangerous

Like to eat cookie dough.

Raw.

Spoonfuls and spoonfuls of cookie dough.

We're talking drive to the store buy a roll of cookie dough and attack it with an eating utensil...or skip the middle-man and use your mouth before you even get it home...with never the nary intention of cooking it to the proper "anti-E. coli" temperature that every other sane human being seems to be so capable of.  
I love cookie dough.

It is - if I dare say - just as good as a freshly baked cookie and waayy better than an old one.

It's even worthy of this blog post I saw awhile back.  And while the intention was to familiarize the world with the blogger's newest cookie dough creation, it came off as one of the greatest odes to cookie dough I've read, ever.

Skim through it, if you have the time: To Cookie Dough, A Love Letter  (name change is all mine. :)

So being that it is on my Top 10 Foods Of All Time list, I felt obliged to remake the edible Cookie Dough Fudge I posted about a few weeks ago.

The concept was superb, but the powder sugar flavor was overwhelming.  I understand trying to make a fool proof recipe (I had to make this one twice), but if you are going to fashion something with cookie dough, don't you think it deserves the best the world has to offer?  The most delicious, legit fudge - candy thermometer or not?

I'll answer that.

It does.

--

And now a cookie dough fudge that is 50 times more delicious than that other stuff...

I present to you "Take Two."

Brace yourself, it's about to get crazy involved.  But I learned so many important lessons during this whole "fudge" experience that what kind of blogger/baker would I be if I didn't pass on my blood-sweat-and tears earned wisdom?
Cookie Dough Fudge

Cookie Dough Fudge:
  • Candy Thermometer 
  • 1 3/4 cup sugar
  • 3/4 cup brown sugar
  • 1/2 heavy cream
  • 1/4 cup milk
  • 1 Tbsp corn syrup
  • 3/4 tsp salt
  • 2 Tbsp butter
  • 1 tsp vanilla extract
  • 1/2 cup flour
  • Edible Cookie Dough
  • 1 cup chocolate chips

Edible Cookie Dough:
  • 1/3 cup butter, room temperature
  • 1/4 cup sugar
  • 1/4 cup brown sugar
  • 1/2 tsp vanilla
  • 1/8 tsp salt
  • 2 Tbsp cream (or milk)
  • 1/2 cup flour

*Side Note: After tasting the fudge, I highly suggest you double the Edible Cookie Dough recipe.  I can't vouch for how the end product tastes or holds up because I didn't do it, but, for me, the sweetness of the fudge overpowered the cookie dough flavor.  If I was to make this again, I would double the recipe.  

Fudge
1) In a medium/large sauce pan combine sugar, brown sugar, cream, milk, corn syrup, and salt.  Cook  
    over medium heat, stirring occasionally, until sugar mixture reaches 242F degrees (what is known as 
    the "soft ball stage").    
Tips for Tricky Things Like Fudge
*You'll want to have your candy thermometer attached to the side of your pan so it is constantly 
   immersed in the mixture, but not touching the bottom of the pan.
*Additionally, you will want to make sure that your candy thermometer is accurate as it can drift to read 
  higher or lower degrees over time.  You can test this by boiling a pot of water and seeing what 
  temperature the thermometer reads at a healthy consistant boil.  Since water boils at 212F, add or  
  subtract degrees as needed to get a correct reading.  (i.e. if your thermometer reads 192F at boiling 
  point...as mine did...you know you must add 20F to your reading.  Hence, the mixture will be done  
  when my candy thermometer reaches 222F).
Bad Fudge Batch #1.  Crusty and clumpy.  This was before it dawned on me to double check my thermometer reading and had grasped the concept of the "soft ball stage."  Learn from my mistakes!

*In addition to watching the temperature of the mixture, you can also determine if it has reached the 
  correct consistency by testing small amounts in a cup of cold water.  As the temperature is nearing 
  242F, take a small spoonful of the mixture and plop it into a cup of cold water (from the tap is fine).  If
  you are able to grab the mixture and roll it into a soft ball - kinda like play dough - you are set!  Take 
  the mixture off the stove.  If not, and the mixture is still too runny wait 30 sec - 1 min and try again. I  
  found this video that was a lifesaver!  Not only does it thoroughly depict what is and isn't softball 
  stage (at the 1:53 mark), it also has some plain good advice...which I gladly took. 

2) After mixture has reached soft-ball stage, remove from heat and place on cooling rack.  At this point 
    it is very important that you stop stirring until the mixture has cooled to about 110F degrees.  Add 
    the butter and let melt on top of sugar mixture, remembering not to stir.  Stirring after it has reached 
    242F will cause it to have a grainy texture.  
3) Once sugar/butter mixture has cooled to 110F (about an hour), add vanilla and flour.  With a hand 
    mixer beat at medium speed until ingredients are combined and mixture is thickened, approx 3 min.
4) Add Edible Cookie Dough to fudge and mix until just combined.  (The best time to make this 
    would be while the fudge is cooling).
5) Grease or spray an 8x8 inch baking dish and add cookie dough fudge.  Smooth with a spatula if 
    needed.  
6) Sprinkle chocolate chips on the top and lightly press them into the fudge.  The fudge will be still too 
    warm for the chocolate chips to be mixed into the fudge.  Trust me, I tried...hence the little chocolate 
    swirls in my pictures.  
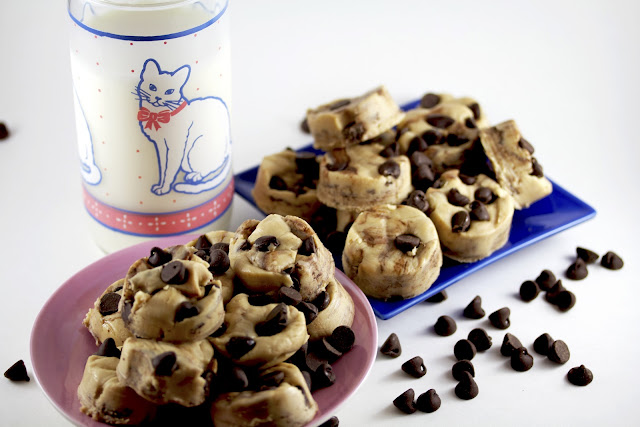
7) Place fudge in the refrigerator for at least two hours or until set.  Cut into squares...or circles.  Eat.  
    Enjoy.  Savor.  
Good Batch #2.  Picture on left is sugar mixture at softball stage with butter melting on top.  
Fudge should be smooth not clumpy, picture on right.


Dough (Can be made while fudge mixture is cooling)
1) Cream butter, sugar, and brown sugar in a medium sized bowl.  Beat until fluffy.  
2) Thoroughly mix in the vanilla, salt, and milk.
3) Add flour to mixture and beat until just combined.  
You can keep your motorcycles and crazy rock and roll music. 
I've got safe-as-vanilla cookie dough!
I. Am. A. Grandma.  


Photography by Travis Howland Photography 


This post was featured:


Thursday, August 30, 2012

Dirty Chai Cookies (★ ★ ★ ★ ☆)


Psst.

I've got a secret.

Okay, I'm not really sure how "secret" it is.  But I've got some information.  And this information has the potential to rock your world. 

But for this to really pack the punch, I must first set the scene.

It's kind of like those episodes of How I Met Your Mother that open up with something completely outrageous and then back up and break it down.  (How totally great are those?)

I love Starbucks. 
Well, actually I love lattes.  Alright, let's break it waaayy down.  I. Love. Foam.

It's like velvety, creamy, whipped goodness.  
But there is good foam and then there is bad foam.
Bad foam is airy, bubbly, runny, flat.
Good foam is like meringue.  Seductive.  Delicious.  A dollop of heaven along with your daily caffeine.

My fondness for Starbucks then doesn't come from the atmosphere or quality, but from the sheer convenience.  It's the new McDonald's.  There is one on every corner.  No other business in the world offers me so many chances to grab coffee and frothy steamed milk. 

Well played, Starbucks, you have earned my respect...and my heart.
Instant Chai Latte Mix, Chai Tea, Instant Espresso, 60% Dark Chocolate Chips


I enjoy all things latte.  I enjoy such things to the extent that I volunteer (as in--for free) at our church cafe several times a month.  The best perk?  Free coffee...all the time.  Win. Win. Win. Win. Win.  

It took me months upon months before I was able to produce the kind of fantastic foam that could meet my unrealistic standards.  If I wasn't impressed, it didn't get served.  Okay, so that basically meant I refused to make drinks, but how can you fault me?  Inferior foam is in an offensive league all its own.  

Once I got that hurdle behind me, it opened up a whole new world of experimentation.  And experiment I did. 

I will try anything.  Edible.  I will try anything edible.  Let me clarify.  Don't get crazy. 

I have a cafe "partner in crime" and together we came up with some doozies including the Cherry Vanilla Latte and my personal fav the Tapatio Latte (the experience - because the taste was just horrendous).

One day, a light bulb went on in my head:

"*Bling* Omg, I know how to fix everything that is wrong with the Chai Latte! Add some shots of espresso!"

My genius lasted all of two seconds.  Because well #1) pretty much everyone loves Chai Lattes, but me. I don't get it.  It's like spicy watery milk and #2) the "Dirty Chai" already exists.  Even Starbucks carries it.  (Yes, the "dirty" part refers to the color of the espresso.  Geeze people!). 

Nevertheless, these are so good I'll let it slide that someone invented it before me.  No biggie.  Heck, I'll even let it slide that Starbucks can make fantastic Christmas-in-a-cup-goodness and yet they keep it on their SECRET menu!  Starbucks, how could you?!

And when it's iced....oh, don't even get me started.
So when a friend of mine asked if I would bake something for the dessert bar at her wedding, I jumped right on that.  I knew we both liked chai.  In fact, she was there the night I came up with my brilliant-idea-that-already-existed-but-nobody-deemed-important-enough-to-tell-me-so-I-had-to-figure-it-out-on-my-own-and-then-not-even-get-to-take-the-credit-for-it.

But I've let that go.  

So the question was: How could I make a dirty chai cookie?

Once I found these Chai Latte Cookies, I knew I had my inspiration.

I added extra chai....like straight up from a tea bag (the spicier the better),
Switched out the buttercream for an espresso ganache,
And boom...
I present to you: The Dirty Chai Cookie.
Dirty Chai Cookies

Chai Cookies:

  • 1 cup butter (2 sticks), room temperature
  • 1/2 cup sugar + 1/4 cup for rolling
  • 2 packets instant chai latte powder (1/3 cup)
  • 2 tsp chai tea
  • 1 egg
  • 2 tsp vanilla
  • 2 cups flour
  • 1 tsp baking powder
  • 1/2 tsp salt

Whipped Espresso Ganache:

  • 10oz semi sweet chocolate chips (I used dark chocolate)
  • 1 cup heavy whipping cream
  • 2 tsp instant espresso

Cookies
1) Preheat oven to 375F.  Line baking sheet with parchment paper.
2) In a medium sized bowl, beat butter, sugar, chai latte powder, and chai tea (I used Tazo.  Just cut
    open the bag and measure!) until fluffy.
3) Add vanilla and egg.  Beat until well mixed.
4) In a small bowl, mix flour, baking powder and salt together.
5) Add flour mixture to sugar mixture a little bit at a time until thoroughly combined.
6) Pour 1/4 cup sugar in a small bowl.  Take a small amounts of dough and roll it into a tiny balls -
    approx. 1/2 inch.  (Seriously, with these think super small. Remember you are going to add another
    cookie plus ganache).  Toss into sugar bowl and place on cookie sheet an inch apart.
7) Very gently press the flat bottom of a glass onto the top of each dough ball.  You just want to flatten
    the top slightly, you don't want increase the diameter of the ball.
8) Bake for 8 minutes or until dry to touch.  Makes approx. 40 cookies.

Ganache
A) Set aside chocolate in a heatproof bowl.
B) In small saucepan, heat cream just until boiling.
C) Add espresso powder to cream and stir until dissolved.
D) Pour cream over chocolate chips and stir until melted and thoroughly combined.
E) Let ganache cool to room temperature.  With a hand mixer beat until slightly fluffy.  Be careful not  
     to over beat.  Mixture will become like chocolate butter and be very difficult to spread.  (Tip: if
     needed to help with the whipping process place bowl in the refrigerator for a few minutes. Be
     careful as ganache gets very firm once chilled and will be extremely difficult to spread.)

Spread a small amount of ganache onto one chai cookie half.  Top with another.  If cookies will not be eaten right away they should be refrigerated, but ganache will hold up as long as not in direct heat.
And they were delish!  This dough is to die for. 


Today photos by: ME!!!  And my new DIY lightbox!


These were Featured: