Showing posts with label simple. Show all posts

Sunday, July 7, 2013

"Independence Day" Ice Cream Cupcakes (★ ★ ★ ★ ☆)

Alright, let's just get the fact that it's no longer the 4th of July out of the way.

It's still July and I celebrate birthdays all month long.  So as far as I'm concerned, Happy 7th Day of your 237th Birthday, America!

I made these for you!  Because I love you!

But also,

...Because I love me.

I mean, you can't really eat.
I don't want to be "that" girl.  You know, the one who bakes for her country, and then sits all sad at home while these ice cream cupcakes melt and go to waste because you never showed up.

I knew going into this that I'd have to eat them myself.

Rest assured, though, I made you something worthy.
I took time to stretch my non-decorating skills.
And savored every bite in your honor.

Then, in my honor, I made sure they were super simple and stinkin' good.
But I have something to confess to you.

It's kind of serious.

I broke a self-imposed baking rule for these.  

Probably the second most sacred self-imposed baking rule of all...right after:
"Rule #1: All Artificial Sweeteners Must Be Exorcised From Nat's Presence When Baking Is To Occur."

I don't even know how to tell you, so I'm just going to spit it out...

ppphaaaa ahhhhh hhhhoooo kkkaaaayyy

I'm about to suggest that you use Cool Whip.
Gasp!       Shock!       Awe!

Yes.  It's true.

For this recipe...      Just this once...

I am officially a Cool Whip promoter.

A promoter of chemically, fake, wannabe whipped cream.

I am actually suggesting you abandon the fatty, fluffy, smooth, delicious treat from God Himself, in favor of this man made garbage.

Effectively breaking, "Rule #2: Imitation Whipped Cream Shall Never Cross Thine Lips."
I know!

What is the world coming to?
What is this blog coming to?!!??
You all know I love whipped cream.

Whipped cream is my hommie.  My love.  My main baking squeeze.

But for these delicious morsels, Cool Whip is your guy.

You see, I make ice cream with whipped cream all the time.  And I know two things to be true:
1) It freezes rock solid.
2) It's extremely rich.

Two things you definitely want to avoid for these ice cream cupcakes.

1) You aren't eating these with a spoon.  They need to have "bite-worthy" texture.  I don't need anyone
    chipping a tooth.
2) Mixing ice cream with whipped cream seems like an unnecessary health burden. Heart attack, much?

I double-dog, triple pinky promise that I would never suggest this to you if I didn't think it tasted amazing.

And, oh, it does.

It's like mousse.  Ice cream mousse.
So light and creamy and refreshing from this soul crushing heat wave we've been having.

These are pretty much a summer must.

So please forgive me.
My goal is to give you the best.
And if the best involves Cool Whip, then so be it.
Ice Cream Cupcakes
recipe slightly adapted from The Domestic Rebel, and introduced to me by Aimee.  That one bite changed my life.

  • 1 - 1.5 Quart Tub of Ice Cream (I used Cake Batter to get the color I wanted)
  • 1 - 8oz Tub of Cool Whip (thawed)**
  • 20 Oreos (or small round cookie of choice)
  • 20 Cupcake Liners
  • (Optional) Sprinkles

Makes 20 Ice Cream Cupcakes
Requires freezing time (2-6hrs)
**Addendum: Apparently Trader Joe's has their own non-hydrogenated oil House Whip.  Wish I knew that before I made these.**
1) Set ice cream out for about 20 minutes before starting.  Cool whip must be thawed from the freezer
    (this can be done overnight in the fridge).
2) Line two muffin tins with 20 cupcake liners.  Place cookie at the bottom of each one and set off to
    the side.
3) In a large bowl, scoop in softened ice cream.  Add tub of cool whip and fold until combined.
4) (Optional) If adding topping/decorations sprinkle a small handle into the mixture for added color and
    texture.
5) Using a kitchen spoon, scoop ice cream mixture into cupcake liners.  Keep adding until the mixture 
     just reaches the top of the liner.  Smooth with the back of the spoon to help level out the tops.
6) At this point, my mixture was very melted so I put in the freezer for about 30 minutes before I added 
    the decorations.  If your mixture is holding its texture go ahead and decorate now, otherwise, pop in 
    the in the freezer for a little bit (just to set) then decorate.  These things thaw out very, very, very 
    quickly.
7) Once decorated, freeze for at least 2 hours before eating.  6 hours to overnight is preferable, but I 
    ate one at 2 hours and it was fine, just not as firm as it could've been.  
8) A side note: these thaw within minutes so they need to be in the freezer until immediately before 
    serving.  The cool whip mixed in prevents these from getting very hard.  
Sure I missed America's Birthday and I endorsed Cool Whip, 
But I just drooled because of my own photo...  
And that's plain embarrassing. 


-----


This post was featured on:


Thursday, January 3, 2013

Chocolate Covered Bacon (★ ★ ★ ☆ ☆)

Today's post is brought to you by some men.

Well it was inspired by some men anyway...it's still brought to you by me.  

But you'll like it because it involves chocolate.

Oh, and bacon.

Yes, BACON!!
This Sunday, my house was graced with some carnivorous fellows.  

Not only did they hand-make the largest beef patties I have ever seen, but one ambitious male...*cough*, er, my Brother...decided that his should be composed of, what looked to me, to be a quarter pound of bacon.  

Now that's some raw, pure bacon love. 

I didn't want to bake this week.  Since Thanksgiving, I've been hard pressed to find an ounce on my body that actually craves sugar anymore.   It's the holidays, am I supposed to crave something before I shove my face full?  Oh, ya.  That's right.  Whooops.  

I thought these burgers were impressive enough to merit a post, so I just paparazzi'd these poor guys to my hearts content.  

...But that was before the smell of sizzling bacon began to waft through the house.

...and that still, small, ever present voice whispered to me - "chooocoolaaattteee." 

And it was cinched. 

Various stages of joy.  Devouring at it's finest.

Ladies and Gentlemen - The Half Pounder.  My Muse.  


I don't know what it is about bacon.

But it's amazing, isn't it?

What other breakfast food is worth mutilating your foot on a George Foreman grill for?

What other crispy delight can merit an entire comedy segment that rings so true it brings tears to your eyes?

And what other meat could possibly be smothered in chocolate?

Nary a one, I tell you!
Chocolate Covered Bacon

  • 1 Package (16 oz.) of Bacon
  • 1 - 2 Cups of Chocolate Chips
  • 1 - 2 Tbsp of Vegetable Oil
  • Optional Decorations (Sprinkles, White Chocolate, Sea Salt, Slivered Almonds)

Makes Approx. 15 pieces
Needed: A tall, microwave-proof cup
Needed: Parchment or Wax Paper
How to cook delicious bacon:
1) Preheat oven to 400F Degrees
2) Lay bacon side by side in roasting pan (or pan with edges).  The less they touch the better (they start
    to meld to one another), but just try your best.  As you can see, I started lining the sides.  The bacon
    will shrivel as it cooks so I moved them around when more space developed.
3) After 12 minutes, flip the pieces over with a fork or some tongs.  Continue baking in 3-5 minute
    increments until pieces are crisp and beginning to brown.  You may need to remove some sooner and
    cook others longer.
4) Place pieces on a paper towel to soak up any excess oil.
How to dip bacon in chocolate:
1) Start with throughly cooled bacon.  In the tallest, skinniest, microwave-safe cup you can muster up, 
    microwave 1 - 2 cups of chocolate chips.  Start with 1 minute and increase in 30 second increments.  
    Stirring well between each heating.  
2) Add 1 Tbsp of Veggie Oil to melted chocolate chips.  This will help thin out the mixture.  If it is still  
     too thick you can add another Tbsp.  
3) Tilt the cup sideways and dip in bacon.  Flip over to cover both sides.  With your finger scrape off 
    the excess chocolate back into the cup and help fill in any spots that didn't get covered.
4) Place bacon strips on parchment paper to harden.  Sprinkle with decorations as desired, before 
    chocolate is fully set.  You can refrigerate to speed up the process.

---

I thought these were pretty good. The mixture of salty and sweet with an added crunch is actually not bad. And definitely worth trying especially since they are so easy to make and will cost you $3 a slice at any candy store.
Bacon.  
It's for men, women, and children.  
The uniter of us all.  


Thursday, December 6, 2012

Gingersnap Magic Cookie Bars (★ ★ ★ ★ ☆)


Why don't you go ahead and settle in, grab your morning coffee,  because I want to tell you a little story.

A little story called "Why My House Isn't Safe For Magic Cookie Bars: Or Anything With Copious Amounts of Sugar."

So the title's a little excessive.
But it's my story.
And I think it's perfect.

I honestly contemplated changing the names in this because my family might kill me, but where's the fun in that?

Plus, after reading about Person 1, Person 2, Person 1 again, then Person 3...you're just going to get all confusl'd.

So since I'm going there, let's just lay it all out right now.

Mom,
          Dad,
                  Bestie

Prepare to be famous.

Brother - You are safe.  You don't like coconut.
So I'm baking Monday night, pretty much the usj.

Nothing too interesting there.  Except that everyone was home.  [Dun, dun, dun, duuuuuuuuun].
I'm used to having the house to myself on baking nights.  Just me, an iPod, and an electric mixer.

See when you are alone there are baking pros and cons.

The Cons.

  • You are lonely

That's it.

The Pros.

  • You are lonely so you can focus and do your best baking.
  • You are lonely so you get to listen to your music as loud as you want (and dance around while belting out Mariah Carey Christmas songs into a wooden spoon.  Not that I do that...just the "option" is there).
  • You are alone so you can tweak any recipe to your heart's content.
  • You are alone so you can taste test something fresh from the oven without swarms of "sugar deprived" eyes glaring back at you.  

Three hungry people, one blogger.
There's bound to be conflicts of interest.

Bloggers have a different mindset.
We don't bake to eat.
Well, ultimately we do, but not before our desserts have paid their dues.
Prepping, styling, photo shoots, etc.

Much to the chagrin of my family members.

---

So back to the story.  I take the bars from the oven.  Not two minutes after I settle down to watch a Christmas movie, do I hear the terrifying sound of a knife slicing into melted chocolate and toasted coconut shreds.

Bakers can totally hear that kind of stuff. 

Now, I'm not against sharing.  I understand I have infused the house with an irresistable aroma. But I worked hard on those cookie bars.  The idea.  The shopping.  The baking.  The documenting.  After all is said and done every post costs me about 8 hours of free time...so I'm none too thrilled by the sound of my hard work about to be mutilated at the hand of someone other than me.

Me: "Nope." 
Dad: "You serious?"
Me: "Yep."
Dad: [Insert crazy pout.  Like I just told him I think going to college is a waste of time.]

Sure he's my dad.  He's only sacrificed everything for me.  But I still like to have the final say in what happens to my baked goods...and when.  Call it my controlling "vice," but I'm not ready to give it up. 

Twenty minutes later, after the cookie bars had cooled the "proper" amount of time, it was time to slice and share.  But only a taste, because these babies still had work to do.

Mom and Bestie were beside themselves and promptly consumed their share.
But Dad, nope.  He was good.  The moment had past.  
On his terms, or no terms.  Like Father, Like Daughter.  

Suddenly, an even bigger dilemma than I could have ever predicted arose - There was one piece and two willing participants.  

I mean the obvious, reasonable thing to do would be to share, right?
And that's what happened.

Until my Mom convinced Bestie to refrigerate the "precious" morsel because it would "taste better."  I walked into this:

Mom: "I'm so sorry.  I ate the whole piece.  I couldn't stop myself."
Bestie: [Insert Stunned Silence.  Cue welling of tears.]
Mom: "When Natalie goes to bed, I'll cut you another one."
Bestie: "Wait.  You really ate the whole thing?"
ME: "Excuuuse me?"
Mom: "No, I'm just kidding. I only moved it to the door."
Bestie: [Insert pent up chuckle].
ME: "...Uh, what was that about me going to sleep?"  

No joke, totally had a nightmare that I woke up to find 4 measly pieces.
Me: "What the heck happened?!"
Mom: "I'm so sorry.  They were just so good!"
Me: "I still had to take pictures!!"

I breathed a sigh of relief when I found the pan safe and sound, pristinely wrapped on the counter in the morning.  But did that stop me from hiding that dish in the tupperware cupboard?  

No.  
No, it did not.  
Gingersnap Magic Cookie Bars
adapted from Love from the Oven

1 Stick of Butter (1/2 Cup)
1 1/2 Cup Gingersnap Crumbs
1 - 14 oz. Can Sweetened Condensed Milk
2 Cups Nestle Holiday Chips (or 1 Cup Semi-Sweet and 1 Cup White)
1 Cup Chopped Walnuts (Pecans work well too)
1 1/3 Cup Flaked Coconut

Needed: 9 x 13in Pan
Preheat Oven to 325F Degrees
Cook for 25-35 Min
Makes Approx. 24 Bars

1) Crush gingersnaps into fine crumbs.  I used a meat tenderizer and a coffee grinder to finish up the 
    job.
2) Preheat oven to 325F Degrees.  Place cube of butter in 9 x 13in pan and place in oven to melt while 
    preheating.  Check every few minutes to make sure it is melting and not getting burned.
3) In the meantime, chop up a cup of nuts.
*Suggestion: I LOVE crust.  And I found this recipe to be a little on the thinner side.  What I would 
                      do next time is increase the butter to 1 1/2 cubes and double the cookie crumbs.  Or do 
                      1 Cup Gingersnaps, 1 Cup Graham Crackers.  Grahams are a lot sweeter and less spicy.  
4) Once butter is melted, remove from oven and place on heat safe surface.  Sprinkle cookie crumbs 
    evenly over the butter and gently pat down with the back of a spoon.  Make sure the entire bottom 
    surface is covered.
5) Pour can of condensed milk over the crust layer.
6) Next add 3/4 Cup Nuts, and 1 1/2 Cup Chocolate Chips (saving some for the very top layer).
7) Sprinkle the coconut evenly over the nuts and chocolate.  Pat down gently.
8) Top with remaining nuts and chocolate chips.
*Suggestion: I've made these before and "pre" toasted the coconut.  I wish I had done that this time.  I 
                       love the toasty smell and taste of the coconut after it's been baked for awhile. If you want 
                       to pre-toast the coconut, line a baking sheet with foil and spread the coconut thinly 
                       across.  At 350F, bake for no more than 5 mins.  Watch carefully that these do not burn.  
                       You want to see the edges of the flakes just beginning to darken. 
9) Bake for 25-35 minutes.  Top should be slightly browned.  Remove from oven and place on cooling 
    rack.  Allow to cool completely before cutting and serving. 
Do not think me cruel. After these pictures, my family had their fill.  
All Tuesday night, they ate to their hearts content.
Then came Wednesday. And I brought the rest to work.
So Bestie cried.  

Oh geeze. 


Thursday, November 29, 2012

Simple Peppermint Bark (★ ★ ★ ★ ☆)

Today I'd like to talk about experimentation and making assumptions.

Because apparently, I have a major problem with both.  

Apparently, I think I'm the Baking Queen of the Universe.  
And that everything that develops in my pretty little head is sure to emerge from the oven to the sound of an angel's chorus.

And apparently, I assumed I knew enough baking basics to be able to double up a batch of brownies by simply adjusting the temperature and time.

Apparently, I was wrong. 
Here are just some of the sad pictures I took of the "Peppermint Bark Brownies," I concocted this week.
1) The obligatory "ingredients" shot
2) The artsy "look at my cool photo skills" shot of crushed candy cane pieces
3) The anticipatory "pre-oven" shot
4) The "I'm-such-a-dork-for-taking-all-of-these-photos-and-seriously-having-no-reservations-about-
    baking-two-batches-of-brownies-in-one-pan-or-mixing-up-a-mint-cream-cheese-layer-that-was-
    suspiciously-watery" photo

Needless to say, they did not turn out.

Unless, you consider a rock hard burned "crust" layer, an overly browned "cream" layer, and a goopey, soupy center, a delectable treat.

That'd be like that Gilmore Girls episode where Luke brings Lorelai a batch of brownies that he accidentally dumped triple the amount of cocoa in because he knew only she possessed such a superhuman chocolate tolerance...that, and he wanted her to let his punk nephew study with her angelic daughter...oh, ya, and he was secretly in love with her.

Ya, just like that.
Only not at all.
I'm just obsessed with the Gilmore Girls.

And with Peppermint Bark.
So obsessed that when my original idea failed, I switched to the tried and true.  

Simple.  Easy.  Plain ole'.  Peppermint Bark.

And ate half the sheet by myself.  In two days.  
Simple Peppermint Bark
adapted from Savory Sweet Life

1 Cup Chocolate Chips
1/2 tsp Peppermint extract
1 Cup White Chocolate Chips
3 Candy Canes, crushed

Makes one small 7x11 pan (Double the recipe for a 9x13)
Parchment or wax paper for lining the pan
Approx. 40 Minutes Chill Time
 1) In a microwave safe bowl, heat 1 cup of semi-sweet chocolate chips in 30 second increments.  Stir
     well between heatings.  You want them to be just melted, not boiling hot.
2) Add 1/2 tsp of peppermint extract, stir well.
3) Line pan with parchment paper and spread chocolate evenly into the bottom.
*Tip: You can spray a spatula with Cooking Spray to keep the chocolate from sticking.
Note: I did not line my pan with parchment paper.  I paid the price.  Assumption #348: "I can make
          simple peppermint bark without thoroughly reading through the recipe."  Getting peppermint
          bark out of a greased-only pan has a 76% success rate.  Get parchment paper, wax paper, I don't
          care!  Line. that. sucker.
4) Place in the freezer for about 15 minutes.
5) In a ziploc bag, crush candy canes into very small pieces.  A meat tenderizer works well.
6) Heat 1 cup of white chocolate chips in the same manner as before and spread on top of the slightly 
    hardened chocolate layer.  Spread quickly as the bottom layer will begin melting and mixing.  
7) Sprinkle crushed candy cane pieces across the top and lightly press down to make sure they get in 
    the chocolate.  Do this quickly.  You'd be surprised how soon some areas harden because the pan 
    is cold.
8) Place pan in the freezer until completely set.  At least 30 minutes.
9) Once set, take the parchment paper out of the pan and peel off of the bark.  Break into pieces using a 
    large knife.  
 Because before you can build a fire, you learn to light a match.
And before you make boxed brownies you...
Oh.  Wow.  

Blame it on the hah hah hah hah hah holidays?


Thursday, September 13, 2012

Cinnamon Roll "Middles" (★ ★ ★ ☆ ☆)

I have a confession.

There was not one ounce of creativity on my part that went into this weeks concoction.  

In fact, these are exact replicas of the Snickerdoodle Donut Muffins that were posted on The Domestic Rebel earlier this year.  

I never intended to change the name...
or even post about them at all.  

I made them on a whim last week when the bestie and I decided to have a BFF day: starting with these and ending with a Moulin Rouge sing-a-long at our local retro theatre, complete with white handkerchief props that were to be waved during I'm sure you can guess what "word" in that pivotal Madonna song.  

These had been in the back of my head since I read that after our dear blogger made these, her family started throwing hissy fits if they were not awaken every Saturday morning by the aroma of piping hot, cinnamon-y goodness wafting through their bedroom doors.  Granted, if she was a mom and these were her kids, I'd say smack some sense into them before it's to late!  But she's the daughter in this situation and these are her parents and brother we are talking about...so it's kind of funny. 

Wouldn't you wonder about a snack that made grown men cry and mothers demand breakfast from their daughters?  

Well, I can tell you that these were pretty. darn. good.  

...and ridiculously easy.  

I feel a little bit ashamed even blogging about it.  

In fact, I was avoiding doing so.  

The first time I made them, I had no camera ready.  My nails were not freshly coiffed.  And the counter was most certainly not cleared.  

I behaved as I would normally on a Saturday morning. 

Fresh out of bed,
Hair mussed,
No make up,
PJs.  

As it should be. 

But after eating them....  game changer.

They taste exactly like the gooey inside of a cinnamon roll.  The middles have always been my favorite part!  How did I discover a way to make cinnamon roll goodness without the dry and crunchy outer layer?!?!  

Okay, reality check.  Once again - not my idea.  Total plagiarism going on here.  

And had this recipe been written in simpler terms, I could have "pinned" it to my Pinterest board and considered my duty to the world - complete.

But no, the directions were so full of exact detail that I had to read each direction four times to thoroughly visualize what I was actually supposed to do.  I didn't go to business school to become a Geometrist, okay! It hurts too much.  

I've always appreciated when bloggers take the time to illustrate each step.  A picture is worth a thousand words, right?  Well, I don't really want to read a thousand words.  I just want clear, concise instructions on how to slice a can of crescent rolls.

So that's what I did for you.  Because you should be able to make these...and give your family addictions...without having your brain explode.

I give you: Cinnamon Roll "Middles:" A Picture Diary.

*Disclaimer: If some of these photos should insult your intelligence please remember I am an equal opportunist baker and cinnamon roll "middles" should to be enjoyed by all regardless of IQ or political affiliation. Thank you.

---------------------------------
Cinnamon Roll "Middles"
Basically Snickerdoodle Donut Muffins by The Domestic Rebel.  But they taste more like cinnamon rolls to me. 

1 Can of Crescent Rolls (Brand/Size doesn't matter)
3 Tbsp Melted Butter
1/2 Cup Sugar
1 Tbsp Cinnamon


1) Preheat oven to 375F degrees.
2) Grease a muffin pan with cooking spray or butter.


3) Roll out dough and separate into 2 sections.  There are 8 triangular pieces (or crescent rolls) per 
    can.  These triangles are attached two by two into rectangular sheets.  There are 4 of these sheets per 
    can. Arrange the dough so there are 2 sections of 2 sheets stacked on top of each other.
4) Cut the stacks in half down the middle so now you have 4 smaller rectangle stacks.
5) Pinch the edges and any perforations on each stack together so the 2 layers become connected. 


6) Cut each of the 4 sections into 4 strips lengthwise.
7) Then cut these strips crosswise to create 8 tiny rectangles from each section.  There should now be 
     32 pieces in total.
8) Roll each section into a ball.


9) Melt 3 Tbsp butter in microwave proof bowl.
10) Measure out 1/2 cup sugar and 1 Tbsp cinnamon and mix thoroughly in a small container.  


11) Coat each rounded piece in butter.  If you have a pastry brush you can use that to help cut out some 
      calories or just dunk the whole thing into the butter dish.  


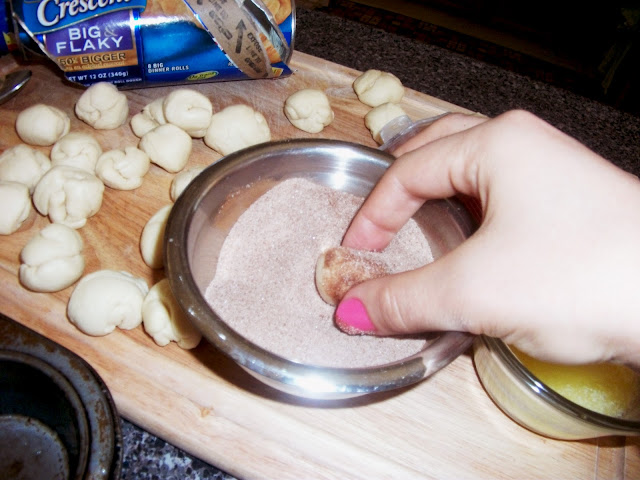
12) After coating in butter, immediately toss each dough ball into the cinnamon-sugar mixture.  Toss
      the heck out of it.  The more cinnamon-sugary goodness on each piece, the better.


13) Place 4 pieces into each muffin cup, stacking them on top of each other.  Lightly pinch the pieces
       together to help them remain in place and not fall apart after they've been cooked.
14) Fill any empty muffin cups with a little bit of water.
15) Bake for 8-9 minutes.  They are done when the tops no longer look doughy.
16) Let the rolls cool in the pan for a minute before removing.  Since these are in pieces that may not be
      stuck together well, you can flip the muffin pan upside down on a cooling rack to get them out.

And Presto Chango - you have dangerously easy, mega delicious Cinnamon Roll Middles.

And what would cinnamon rolls be without a glass of milk? (Or a shameless plug for The Muppets? How cute is this glass?????)

I totally have a thing for Miss Piggy.  I love her unwavering self confidence.  She, without a doubt, believes she is the most beautiful thing to walk the planet.  I mean, let's face it.  She is a fat pig. It's magnificently inspiring.  Plus, she and Kermit are only like one of Hollywood's most awesome couples!

Okay, back to the task at hand.  Make these.  They are easy.  I took pictures for you.  And they are super yummy. Cinnamon "middles" can be your new favorite Saturday morning snack.
Step aside muffin "tops."
(The baked kind.  Probably not the ones around your hips.  Boo.)


Thursday, August 23, 2012

Fluffernutter Brownie Batter Ice Cream (★ ★ ★ ☆ ☆)

The Odd Couple.

French Fries and Chocolate Milkshakes.

Peaches and a BBQ grill.

Skinny jeans and stilettos.  


What do all these things have in common?

Um, that they are flipping awesome together?!

Sometimes opposites can make the most compatible pairings.

I offer a poignant example:

I know these two people, you see.

One:                                                                              Two:
Has sophisticated taste in music.                                       Has no problem rocking out to the Beibs.
Needs their stories to be full of whimsy and fantasy.            Needs hard core character development.
Loves animals.                                                                 Likes their cat. (singular)
Is a creative genius.                                                         Is an professional organizer.
Extrovert                                                                         Introvert
Blonde (for today)                                                            Brunette (for years)
Tall                                                                                 Short

...Seriously, the list can go on.

One is my best friend, and Two is, well, me.  Notice I said "Best Friend" as in these two total opposites not only tolerate each other, but purposely spend hours upon hours together...like all the time.

Obviously, we have to have some things in common or our hang out sessions would be short lived.
Things like 60's fashion, The Walking Dead, and cupcakes help make up for the times we spend TWO hours trying to pick a movie. ("[Insert 80's Movie Suggestion here]." "Oh, I'm not really into the 80's." "Eighties?? :)" "Um, I said no." "80's!!!" "That's it. Molly Ringwald is going down!")

One thing we have always been able to agree upon is Peanut Butter.

How awesome is PB?  Am I right?!

Peanut Butter and Jelly.
Peanut Butter in a Milkshake.
Peanut Butter on a spoon.
Peanut Butter and...Marshmallow?

Two things I would have never thought to put together, yet the combination seems so....ordained.

How did I not know about this till like a year ago?????  What kind of childhood did I endure?  To not be introduced to the "Fluffernutter?" This is an utter travesty, I tell you.

So what is a peanut butter lover to do?

Whip up the most peanut buttery ice cream on the planet!  That's what.

Seriously, this two-ingredient ice cream is like the best thing ever!
....Add some marshmallow fluff to rectify childhood trauma,
....Top it off with leftover brownie batter for good measure,

And BOOM.

Earth shattering, I know.
Fluffernutter Brownie Batter Ice Cream
-1 can (14 oz) Sweetened Condensed Milk
-2 cups Heavy Whipping
-1/2 cup Peanut Butter
-1/2 cup Marshamallow Fluff
-Prepared Edible Brownie Batter:
       1/4 Box Brownie Mix
       2 Tbsp Butter
       1 Tbsp Water
       Mix together and roll into bite sized bits.


1) Place large mixing bowl in freezer.  (It helps when whipping the heavy cream).  While waiting for
    bowl to chill (approx. 10 min), in a medium sized mixing bowl beat 1/2 cup peanut butter and 1 can
    sweetened condensed milk until well blended.  *1/2 cup is a LOT of peanut butter.  Use 1/4 cup for
    a less overwhelming flavor.

2) After peanut butter and condensed milk are combined add in 1/2 cup marshmallow fluff.  Mix/beat
    till just combined.  Do not over mix.

3) Take large bowl out of freezer and beat 2 cups heavy cream till stiff peaks form.  Fold peanut butter
    mixture into whipped cream. Add brownie bits, folding till dispersed throughout.

4) Place mixture into a covered container (tupperware, etc.) and place in freezer.  Freeze overnight.
    Scoop.  Enjoy!

Tip: Keep a glass of milk handy.
Prepare to have your peanut butter lover socks knocked off.  


Photography provided to you by Travis Howland Photography


Featured June 2013:
Pin It Monday Hop I was Featured