Showing posts with label cookies. Show all posts

Thursday, October 3, 2013

Dipped Chai Cookies (★ ★ ★ ★ ☆)

If this comes off as a love letter, then I apologize.

I'm going to try really, really hard to contain my enthusiasm.

"Once Upon A Time" is back!

Ahem, correction:

My weekly dose of Regina is back!!!

How I love thee, oh, tortured character.

I. am. obsessed.

Let me count the ways...

The fourteen hundred times you snarl, "Miss Swan."
Being forced to obey Mr. Gold's every whim. 
That fateful poisonous apple turnover.
Seeking "magic" therapy.

How can someone be so sinister, so sexy, and so sympathetic at the same time?!  
Oh,  and add smart, sharp, and witty as heck:


Sure she's killed a few people - ripped out a few hearts.

Cursed the purest, truest lovers from ever finding each other.

She may have even kicked a dog. 


But deep down I see the girl with crushed dreams:

The one who watched as her mother killed her true love.
The one who realized her only ally had been the cause of her greatest pain.
The one who adopted a son so she could "feel something."
The one willing to die to save a town so she could be remembered as a person, not a villain.

Gah! Sniff
Cue the waaaaahhhmbulance! And strike up those violins! 
That's a tragic tale if I ever heard one.  

I forgive you, Regina!
You made me lasagna, Regina?
Of course, I'll eat it, Regina!
Why is no one else eating the lasagna, Regina?

Did anyone else feel a tinge when her peace offering was scorned?
Sure it's awkward that the Evil Queen who was hell bent on making everyone miserable is now bringing food to a potluck,
           
        ...why that even came up in the writer's room will never make sense to me...

But come on! Forgive and forget!
Stop harping on the past, fairy tale people! Seriously
I guess they are just blinded to her awesomeness.  
Or their past experiences are too traumatic to move on from.

But I, for one, can't get enough.

Give me Regina.  I want Regina!

What petty argument is going to tip her new found resolve to be good?  
What incident is going to trigger another devastating memory from her past?

This is good TV, ya'll!
What better motivation is there to keep tuning in, week after week?
It's not the "high-budget" CGI - I can tell you that much. 

It's the "will she"/"won't she" suspense.  
Am I watching good Regina or bad Regina?
Poisoned apple/peace-offering apple?
Chocolate or spicy chai?

Oh wait...those are my cookies.  
While I definitely did not intend to bake in honor of a television character, after this weeks episode I knew where this post was headed.

Using my absurdly addicting dough from the Dirty Chai Cookies I made last year, I just broke it down to the basics.

The spicy tanginess of chai mixed with the comforting richness of chocolate.   

A cookie with an identity disorder.  

And a delicious one at that. 


Dipped Chai Cookies
  • 1 Cup (2 Sticks) Butter, Room Temperature
  • 1/2 Cup Sugar
  • 2 Packets Instant Chai Latte Powder (1/3 cup) (I found mine at Whole Foods)
  • 2 tsp Chai Tea
  • 1 Egg
  • 2 tsp Vanilla
  • 2 Cups Flour
  • 1 tsp Baking Powder
  • 1/2 tsp Salt
  • 1 Cup Semi-Sweet Chocolate Chips

Preheat Oven to 375F
Bake for 9-11 Minutes
Makes Approx. 30 Cookies
1) Preheat oven to 375F. 
2) In a medium sized bowl, beat butter, sugar, chai latte powder, and chai tea (Just cut

    open the bag and measure) until fluffy.  For this recipe I didn't have enough chai latte powder so I 

    just added a bit more tea and sugar to compensate. 

3) Add vanilla and egg.  Beat until well mixed.

4) In a small bowl, mix flour, baking powder and salt together.

5) Add flour mixture to sugar mixture a little bit at a time until thoroughly combined. 
6) Place rounded teaspoons of dough onto a greased baking sheet about 2 inches apart.

7) Bake for 9-11 minutes or until dry to the touch.  

8) After cookies have cooled, melt cup of chocolate chips in the microwave in 30 sec increments.  Stir 

    in-between to avoid over heating.

9) Dip each cookie halfway into the melted chocolate and place on parchment paper to set or store in 

    the refrigerator until chocolate is thoroughly hardened again (30 min to 1 hour).  Enjoy!

Because sometimes the answer is "both."


This post was featured:


Sunday, July 7, 2013

"Independence Day" Ice Cream Cupcakes (★ ★ ★ ★ ☆)

Alright, let's just get the fact that it's no longer the 4th of July out of the way.

It's still July and I celebrate birthdays all month long.  So as far as I'm concerned, Happy 7th Day of your 237th Birthday, America!

I made these for you!  Because I love you!

But also,

...Because I love me.

I mean, you can't really eat.
I don't want to be "that" girl.  You know, the one who bakes for her country, and then sits all sad at home while these ice cream cupcakes melt and go to waste because you never showed up.

I knew going into this that I'd have to eat them myself.

Rest assured, though, I made you something worthy.
I took time to stretch my non-decorating skills.
And savored every bite in your honor.

Then, in my honor, I made sure they were super simple and stinkin' good.
But I have something to confess to you.

It's kind of serious.

I broke a self-imposed baking rule for these.  

Probably the second most sacred self-imposed baking rule of all...right after:
"Rule #1: All Artificial Sweeteners Must Be Exorcised From Nat's Presence When Baking Is To Occur."

I don't even know how to tell you, so I'm just going to spit it out...

ppphaaaa ahhhhh hhhhoooo kkkaaaayyy

I'm about to suggest that you use Cool Whip.
Gasp!       Shock!       Awe!

Yes.  It's true.

For this recipe...      Just this once...

I am officially a Cool Whip promoter.

A promoter of chemically, fake, wannabe whipped cream.

I am actually suggesting you abandon the fatty, fluffy, smooth, delicious treat from God Himself, in favor of this man made garbage.

Effectively breaking, "Rule #2: Imitation Whipped Cream Shall Never Cross Thine Lips."
I know!

What is the world coming to?
What is this blog coming to?!!??
You all know I love whipped cream.

Whipped cream is my hommie.  My love.  My main baking squeeze.

But for these delicious morsels, Cool Whip is your guy.

You see, I make ice cream with whipped cream all the time.  And I know two things to be true:
1) It freezes rock solid.
2) It's extremely rich.

Two things you definitely want to avoid for these ice cream cupcakes.

1) You aren't eating these with a spoon.  They need to have "bite-worthy" texture.  I don't need anyone
    chipping a tooth.
2) Mixing ice cream with whipped cream seems like an unnecessary health burden. Heart attack, much?

I double-dog, triple pinky promise that I would never suggest this to you if I didn't think it tasted amazing.

And, oh, it does.

It's like mousse.  Ice cream mousse.
So light and creamy and refreshing from this soul crushing heat wave we've been having.

These are pretty much a summer must.

So please forgive me.
My goal is to give you the best.
And if the best involves Cool Whip, then so be it.
Ice Cream Cupcakes
recipe slightly adapted from The Domestic Rebel, and introduced to me by Aimee.  That one bite changed my life.

  • 1 - 1.5 Quart Tub of Ice Cream (I used Cake Batter to get the color I wanted)
  • 1 - 8oz Tub of Cool Whip (thawed)**
  • 20 Oreos (or small round cookie of choice)
  • 20 Cupcake Liners
  • (Optional) Sprinkles

Makes 20 Ice Cream Cupcakes
Requires freezing time (2-6hrs)
**Addendum: Apparently Trader Joe's has their own non-hydrogenated oil House Whip.  Wish I knew that before I made these.**
1) Set ice cream out for about 20 minutes before starting.  Cool whip must be thawed from the freezer
    (this can be done overnight in the fridge).
2) Line two muffin tins with 20 cupcake liners.  Place cookie at the bottom of each one and set off to
    the side.
3) In a large bowl, scoop in softened ice cream.  Add tub of cool whip and fold until combined.
4) (Optional) If adding topping/decorations sprinkle a small handle into the mixture for added color and
    texture.
5) Using a kitchen spoon, scoop ice cream mixture into cupcake liners.  Keep adding until the mixture 
     just reaches the top of the liner.  Smooth with the back of the spoon to help level out the tops.
6) At this point, my mixture was very melted so I put in the freezer for about 30 minutes before I added 
    the decorations.  If your mixture is holding its texture go ahead and decorate now, otherwise, pop in 
    the in the freezer for a little bit (just to set) then decorate.  These things thaw out very, very, very 
    quickly.
7) Once decorated, freeze for at least 2 hours before eating.  6 hours to overnight is preferable, but I 
    ate one at 2 hours and it was fine, just not as firm as it could've been.  
8) A side note: these thaw within minutes so they need to be in the freezer until immediately before 
    serving.  The cool whip mixed in prevents these from getting very hard.  
Sure I missed America's Birthday and I endorsed Cool Whip, 
But I just drooled because of my own photo...  
And that's plain embarrassing. 


-----


This post was featured on:


Thursday, June 20, 2013

The "Fake" Neiman Marcus Chocolate Chip Cookie (★ ★ ★ ★ ☆)

This recipe is Ron Swanson approved.

Yes, that Ron Swanson.

Ron (bleeping) Swanson.
Pawnee's Parks and Recreation Director.
Wood worker.
Hunter.
Bacon Aficionado.

The man's man.

This may seem weird, but I find him incredibly sexy...mustache and all.  

And I HATE mustaches.  The whole hipster "trend" is horrifying to me.  
But there is just something about Ron's that is undeniably masculine.  
(I kinda like it).  Ew, I did not just say that! 

He's the kind of guy that makes you want to shoot some whiskey, puff a cigar, or pack a shotgun.


Ahhhhh, and in a bow tie no less.

Yes, this cookie would impress even him. 
Of course, he didn't tell me that personally.

But it doesn't matter that I never sent him a lovingly wrapped package of freshly baked cookies. 

Or that he didn't call me to tell me how I am the woman solely responsible for introducing him to his fourth favorite food.

I know - in my heart - he'd accept it.   Because this is a man's cookie.

Un-Fancy.
Extremely Hearty.
Perfectly Delicious.
Plain and simple...it gets the job done.  

And it gets it done well. 
There is quite the urban legend behind these cookies. 

It goes: a woman tried these at the Neiman Marcus café and fell so madly in love with them that she offered to pay for the recipe.
However, she was told that it would cost her “two-fifty.”
Unbeknownst to her, they meant $250, not the modest $2.50 she had anticipated. 
Neiman Marcus was none too sympathic to her story, so in a fit of revenge she mass emailed the world so they could benefit from her $250 mistake.  Hell hath no fury, right?
But I imagine this would leave Ron Swanson quite unimpressed.

In fact, he’d be put off by this woman’s overly dramatic display of emotion....And well, frankly, her stupidity. 
He’d be much more approving of the real story behind my making these cookies. 
I implored my friends to pass along their most beloved chocolate chip recipes, and a one –Jimmy – responded in kind. He went so far as to say that this recipe was “his baby” and “the best dessert he has ever made.”
“The working class man’s cookie”
And there you have it.
The "Fake" Neiman Marcus Chocolate Chip Cookie
Graciously bestowed to me by Jimmy and to him through Ms. Kelene 

1 Cup (2 Sticks) of Butter (room temperature)
1 Cup Granulated Sugar
1 Cup Brown Sugar
2 Eggs
1 tsp. Vanilla
2.5 Cups of Quaker Rolled Oatmeal (before blending)
2 Cups Flour
1 tsp. Baking Powder
1 tsp. Baking Soda
1/2 tsp. Salt
2 Cups (12 oz.) Chocolate Chips
4 oz. of Grated Chocolate Bar

Preheat Oven to 350F Degrees
Bake for 12-14 minutes
Makes Approx. 24 Cookies (using a golfball sized ball of dough - preferred size)
                     40 Cookies (using a tablespoon sized ball of dough)
1) In a medium sized bowl, cream butter and both sugars together.  Mixture will be very thick.
2) Add eggs and vanilla.  Beat until just combined.
3) Measure out 2.5 cups of oatmeal.  (I recommend using Quarter Oats or a brand of oatmeal with a
    softer texture.  I used Trader Joe's brand and it never seemed to cook all the way in the dough).
    Blend to a fine powder.  You can use a food processor or what
    ever you have on hand. (pssst. I used my coffee grinder.)
4) In a small bowl, mix blended oatmeal, flour, baking powder, baking soda, and salt.  Stir to combine.
5) Add the flour mixture to the sugar mixture.  Beat to combine.
6) Add in chocolate chips.
7) Add in grated chocolate.  (I tried to use a cheese grater, but the chocolate kept melting in my hand.  I 
    ended up chopping the remaining pieces as finely as I could).
8) Roll dough into golfball-sized balls and place two inches apart onto a well greased sheet. (You can 
    make these smaller, but I found this to be the best size texture-wise and had the perfect balance of 
    crisp-to-chew-to chocolate gooeyness). Place in 350F Degree oven for 10-12 minutes. Tops will be 
    cooked, but not brown.  This dough cooks to a lighter color.  Leave on baking sheet for 2-5 mins to 
    cool, then place cookies on cooling rack. 
9) This dough does not need to be refrigerated overnight first.  It actually gets very hard in the fridge.  If 
    you do have leftover dough, just let it sit out on the counter for a few minutes before cooking again. 
-----

Review: Are these the best chocolate chip cookies in the world?  I don’t know. 

But they are darn good.  And the dough is literally the best tasting dough I’ve ever had in a chocolate chip cookie.  The ground oatmeal gives them an UNBELIEVABLE flavor!
They are crispy on the outside and perfectly gooey in the middle. 
My only issue with them is that they lose their exquisite texture overnight.  These are definitely bake’em and eat’em cookies.  And you have to get the right oatmeal brand.  I used Trader Joe’s and even though I blended them to a pulp, I could still taste the hard, uncooked (microscopic, mind you) flecks of oatmeal.  Next time, I’ll use Quaker Oats and see if that solves my problem. 
Notice, how I said next time?  Meaning, I’ll make these again? 

Ya, that’s pretty rare. 
Actually, I’ve already made these twice in the past week. 
And if that doesn’t say something about these -  I don’t know what will. 
For the working man, woman, child,
And mustached Ron's of the world,
This is for you.


 These were featured June 2013:

Friday, February 1, 2013

Double Chocolate Cereal Cookies (★ ★ ★ ☆ ☆)


I don't know that I've ever related to a cookie more.

You see for the past month, I've been doing two people's jobs.  

Worn two (though similar) hats...
Tried to maintain the quality of my work along with the person's that I am covering for...
Dropping one to pick up the other...

And what does it result in?

Adequate performance.
Nothing crumbling to pieces.
Nothing amazingly praiseworthy.

Okay, enough of the business-y jargon,
Bascially, two people doing two jobs are better than one. 
And when thinking of how to describe these beauties, I couldn't help but notice the parallel.

These cookies, while salivating-ly gorgeous (am I right?!?), were trying too hard to be too many things to too many people.

And by no one's fault but my own.

It all started with a looming leftover box of Chex cereal from my Muddy Buddy Cookies.

Stupid Safeway, only had the ginormous box.
No one likes Chex that much.  
...it's not chocolate  
...there are no marshmallows  
...it's not chocolate 
...I didn't get the honey coated kind.  
...it's not...well, you know.              
[chocolate] couldn't help myself

Anyway, I bake too much to just throw stuff away.
Waste not, want not. 

So this remaining box of cereal just sat....for months...in my baking bin.
Until one fateful morning, when this morsel appeared in my inbox Chocolate Covered Cheerios.

How good do those sound????  And then the lightbulb  - *bling*

Chocolate covered Chex.
In a cookie.
A White Chocolate cookie.
With Chocolate Chips.

Ya, ya.  That sounds about right.
Only, it wasn't "about right."

It was "about" okay.

I was a little overzealous in my Chex adding.
Like, I just went for it.  
Waste not, want not remember?

And then my "white chocolate" batter just plain didn't work.
It should have dawned on me that this might be an issue when I couldn't find a recipe for white chocolate batter...anywhere...ever.  
I decided to melt white chocolate chips and add them to the batter.  

Easy, right?  

Only there is this interesting thing about chocolate chips - they don't like to be melted and runny...they like to be solid and together.  
So instead of white chocolate cookie dough, I had cookie dough with the tiniest, most minuscule white chocolate "flecks" splattered throughout.

I mean, these weren't terrible.
...But neither am I at juggling two jobs.

It's just, these weren't amazing...in fact, they were, dare I say, slightly disappointing.
...and well, I'm guessing you can fill in how I feel about the "job" part in this equation. 

So even though I'm about to spend a good chunk of time typing out the recipe below...I can't, in good conscience, rave and recommend making these.  At least, not without some tweaks.  

Like maybe only putting a cup of crunchy cereal...you know, instead of three.

And if that doesn't appeal to you - there are pictures.
Double Chocolate Cereal Cookies
[i.e. White Chocolate Cookie Dough, Chocolate Drizzled Chex, White and Semi-Sweet Chocolate Chips]
adapted and inspired by The Better Crumb & Cookies and Cups

  • 1 Cup Chex Cereal
  • 1 1/2 Cup Semi-Sweet Chocolate Chips (Saving 1/2 Cup for later)
  • 2 1/2 Cups Flour
  • 1 tsp Salt
  • 1 tsp Baking Soda
  • 12 oz Bag White Chocolate Chips (Saving 1/2 Cup for later)
  • 1 Cup Butter
  • 1/2 Cup Packed Brown Sugar
  • 2 Eggs
  • 1 tsp Vanilla
Preheat Oven to 325F Degrees
Cook Time: 8-12 minutes
Makes Approximately 20 Cookies
How to Make Chocolate Drizzle
1) Melt 1 Cup of Chocolate Chips in a microwave safe bowl, or a double boiler.  Let cool to almost
    room temperature. (The chocolate will be very hot and may burn you or melt the plastic bag we are
    going to place it in).
2) Once cooled, place melted chocolate into a ziploc bag.
TIP: I like to flip the bag inside out, pile the chocolate on the "inside" part of the bag, then flip it back
         right-ways in.
3) Just slip your hand into the middle of the bag while inside-out, cradle the chocolate with your hand
    and carefully pull the sides of the bag around it until the chocolate is now on the inside.  I do this to
    help keep the chocolate in one general area instead of sloppily spooned all over the bag.
4) Press all of the chocolate into one corner, twisting the top of the bag until a little "triangle" of
    chocolate is formed and packed.  Cut the tip of the corner with some scissors.  The smaller the
    opening the smaller the drizzle lines.
[NOTE]: After making these cookies, I found this "drizzle" step to be obsolete as the Chex just gets
               crumbled all to heck in the batter.  I'd skip this and save a good chunk of time.  Crushed
               Chex with white and semi-sweet chocolate chips is "chocolate covered" enough for me.  If  
               however, you want to take the time to hand dip each and every one...then more power to
               you.  Or, you can throw the Chex into a bowl with the melted chocolate and get them
               covered that way.  I recommend either of these options to the "drizzle."
5) If continuing on with the Chex drizzle: Lay out Chex flat on a baking sheet lined with parchment
    paper.  Drizzle chocolate over the tops.  Place in the fridge until chocolate sets and is firm to the
    touch.
6) In the meantime, you can start making the batter.  In a medium sized bowl, mix together flour, salt
    baking soda. Stir and set aside.
7) In a microwave safe bowl or double boiler melt white chocolate (set aside 1/2 cup of the chips for
    later). Let melted chocolate cool to almost room temperature. (We will be adding the butter next and
    we don't want it to melt).
8) Add cooled (but still melted) white chocolate to a medium sized bowl.  Add butter, cut into cubes.
    (This recipe doesn't call for softened butter so in order for it to mix well, it needs to be cut to a more
    manageable size).  Beat until combined and smooth.
9)   Add brown sugar, and combine.  
10) Next beat in the eggs, one at a time.
11) Add vanilla.  Next, add dry flour mixture a little bit at a time until thoroughly combined.
12) Here is where you add the Chex, and remaining 1/2 of white and semi-sweet chocolate chips that 
      you set aside.  I suggest adding the Chex 1st if you'd like them to be in smaller pieces, and 2nd if 
      you'd like them to be a little larger.  I added my 1st so I still had to add the chocolate chips.  By 
      the time I was done adding and mixing, I couldn't even see the Chex pieces anymore.  
13) Ideally, any batter will be chilled overnight, but if you don't have time it's not required here.  Place 
      heaping teaspoonfuls on a greased baking sheet and cook until "just done" - about 8-12 minutes. 
      Slightly golden and puffed, but not thoroughly set.  They will continue to cook on the baking sheet.  
      Leave on the sheet for 5 minutes before moving to a cooling rack 
TIP: If you want to make these larger, you can.  I did for these pictures - and I liked them better that 
        way.  You will just have to adjust the time accordingly.  Also, because of the Chex, these cookies 
        don't spread well in baking, so you want to slightly flatten them out before baking - especially the 
        larger cookies.
Sure these "goodie goodies" didn't quite live up to their expectations,
But, in this case, I have to say:
Some cookies
Are better than none cookies at all.


Thursday, December 6, 2012

Gingersnap Magic Cookie Bars (★ ★ ★ ★ ☆)


Why don't you go ahead and settle in, grab your morning coffee,  because I want to tell you a little story.

A little story called "Why My House Isn't Safe For Magic Cookie Bars: Or Anything With Copious Amounts of Sugar."

So the title's a little excessive.
But it's my story.
And I think it's perfect.

I honestly contemplated changing the names in this because my family might kill me, but where's the fun in that?

Plus, after reading about Person 1, Person 2, Person 1 again, then Person 3...you're just going to get all confusl'd.

So since I'm going there, let's just lay it all out right now.

Mom,
          Dad,
                  Bestie

Prepare to be famous.

Brother - You are safe.  You don't like coconut.
So I'm baking Monday night, pretty much the usj.

Nothing too interesting there.  Except that everyone was home.  [Dun, dun, dun, duuuuuuuuun].
I'm used to having the house to myself on baking nights.  Just me, an iPod, and an electric mixer.

See when you are alone there are baking pros and cons.

The Cons.

  • You are lonely

That's it.

The Pros.

  • You are lonely so you can focus and do your best baking.
  • You are lonely so you get to listen to your music as loud as you want (and dance around while belting out Mariah Carey Christmas songs into a wooden spoon.  Not that I do that...just the "option" is there).
  • You are alone so you can tweak any recipe to your heart's content.
  • You are alone so you can taste test something fresh from the oven without swarms of "sugar deprived" eyes glaring back at you.  

Three hungry people, one blogger.
There's bound to be conflicts of interest.

Bloggers have a different mindset.
We don't bake to eat.
Well, ultimately we do, but not before our desserts have paid their dues.
Prepping, styling, photo shoots, etc.

Much to the chagrin of my family members.

---

So back to the story.  I take the bars from the oven.  Not two minutes after I settle down to watch a Christmas movie, do I hear the terrifying sound of a knife slicing into melted chocolate and toasted coconut shreds.

Bakers can totally hear that kind of stuff. 

Now, I'm not against sharing.  I understand I have infused the house with an irresistable aroma. But I worked hard on those cookie bars.  The idea.  The shopping.  The baking.  The documenting.  After all is said and done every post costs me about 8 hours of free time...so I'm none too thrilled by the sound of my hard work about to be mutilated at the hand of someone other than me.

Me: "Nope." 
Dad: "You serious?"
Me: "Yep."
Dad: [Insert crazy pout.  Like I just told him I think going to college is a waste of time.]

Sure he's my dad.  He's only sacrificed everything for me.  But I still like to have the final say in what happens to my baked goods...and when.  Call it my controlling "vice," but I'm not ready to give it up. 

Twenty minutes later, after the cookie bars had cooled the "proper" amount of time, it was time to slice and share.  But only a taste, because these babies still had work to do.

Mom and Bestie were beside themselves and promptly consumed their share.
But Dad, nope.  He was good.  The moment had past.  
On his terms, or no terms.  Like Father, Like Daughter.  

Suddenly, an even bigger dilemma than I could have ever predicted arose - There was one piece and two willing participants.  

I mean the obvious, reasonable thing to do would be to share, right?
And that's what happened.

Until my Mom convinced Bestie to refrigerate the "precious" morsel because it would "taste better."  I walked into this:

Mom: "I'm so sorry.  I ate the whole piece.  I couldn't stop myself."
Bestie: [Insert Stunned Silence.  Cue welling of tears.]
Mom: "When Natalie goes to bed, I'll cut you another one."
Bestie: "Wait.  You really ate the whole thing?"
ME: "Excuuuse me?"
Mom: "No, I'm just kidding. I only moved it to the door."
Bestie: [Insert pent up chuckle].
ME: "...Uh, what was that about me going to sleep?"  

No joke, totally had a nightmare that I woke up to find 4 measly pieces.
Me: "What the heck happened?!"
Mom: "I'm so sorry.  They were just so good!"
Me: "I still had to take pictures!!"

I breathed a sigh of relief when I found the pan safe and sound, pristinely wrapped on the counter in the morning.  But did that stop me from hiding that dish in the tupperware cupboard?  

No.  
No, it did not.  
Gingersnap Magic Cookie Bars
adapted from Love from the Oven

1 Stick of Butter (1/2 Cup)
1 1/2 Cup Gingersnap Crumbs
1 - 14 oz. Can Sweetened Condensed Milk
2 Cups Nestle Holiday Chips (or 1 Cup Semi-Sweet and 1 Cup White)
1 Cup Chopped Walnuts (Pecans work well too)
1 1/3 Cup Flaked Coconut

Needed: 9 x 13in Pan
Preheat Oven to 325F Degrees
Cook for 25-35 Min
Makes Approx. 24 Bars

1) Crush gingersnaps into fine crumbs.  I used a meat tenderizer and a coffee grinder to finish up the 
    job.
2) Preheat oven to 325F Degrees.  Place cube of butter in 9 x 13in pan and place in oven to melt while 
    preheating.  Check every few minutes to make sure it is melting and not getting burned.
3) In the meantime, chop up a cup of nuts.
*Suggestion: I LOVE crust.  And I found this recipe to be a little on the thinner side.  What I would 
                      do next time is increase the butter to 1 1/2 cubes and double the cookie crumbs.  Or do 
                      1 Cup Gingersnaps, 1 Cup Graham Crackers.  Grahams are a lot sweeter and less spicy.  
4) Once butter is melted, remove from oven and place on heat safe surface.  Sprinkle cookie crumbs 
    evenly over the butter and gently pat down with the back of a spoon.  Make sure the entire bottom 
    surface is covered.
5) Pour can of condensed milk over the crust layer.
6) Next add 3/4 Cup Nuts, and 1 1/2 Cup Chocolate Chips (saving some for the very top layer).
7) Sprinkle the coconut evenly over the nuts and chocolate.  Pat down gently.
8) Top with remaining nuts and chocolate chips.
*Suggestion: I've made these before and "pre" toasted the coconut.  I wish I had done that this time.  I 
                       love the toasty smell and taste of the coconut after it's been baked for awhile. If you want 
                       to pre-toast the coconut, line a baking sheet with foil and spread the coconut thinly 
                       across.  At 350F, bake for no more than 5 mins.  Watch carefully that these do not burn.  
                       You want to see the edges of the flakes just beginning to darken. 
9) Bake for 25-35 minutes.  Top should be slightly browned.  Remove from oven and place on cooling 
    rack.  Allow to cool completely before cutting and serving. 
Do not think me cruel. After these pictures, my family had their fill.  
All Tuesday night, they ate to their hearts content.
Then came Wednesday. And I brought the rest to work.
So Bestie cried.  

Oh geeze. 


Thursday, October 25, 2012

Muddy Buddy Cookies (★ ★ ★ ★ ☆)


I’ve been a bad blogger mommy. 
(Yes, I’m a nurturer by nature and this blog is my baby.  And no, that’s not weird.)
Yesterday, I was stricken with a terrible disease.  I caught a case of the procrastinations. 
Gasp!
Actually, it’s something I’ve always dealt with, but I haven’t had an episode in so long that when it flared up again yesterday, I just didn’t know how to handle it. 
Granted, I was also nursing a pretty substantial migraine, but that had subsided by 10pm with the help of some Advil and cozy pajamies.  Sure, I could’ve gotten back to work, but by then I was so exhausted that all I wanted to do was watch Parenthood and bawl my eyes out. 
So I did.
And it was gooooood.
-----
I should really be writing these things at least by Tuesday night, but I thrive on pressure.  Every Wednesday night is like a thrilling cramming session.  Can I finish in an hour or will I be up till 2am like that one time I had absolutely nothing interesting to say? 
I know.  I know. I’m ca-RAy-Zay!
But today I let you down.  I know you just wake up every Thursday morning and think to yourselves, “Thursday’s are the worst.  It’s life’s last sick “ah ha” tease before the weekend finally comes to save me.  Well, at least I know I can read Nat’s blog.  That gets me through the day.  Makes me remember why I keep going on.”
I am a bad, bad person.  I’m devastated that I did that to any of you.
So here’s to faking myself out and pretending that my blog entries actually post on Wednesdays.

Just a side note. 
Today’s post is out-of-this-world delicious. 
Definitely worth the wait.  Promise. 

I am like a big kid. 
And frankly, I don’t think I’ll ever grow out of it.
I still get excited about going to Disneyland.  No, like, embarrassingly excited.  Like, Ride-Pirates-of-the-Caribbean-10-times excited.
I always bite the heads off of any cookie shaped like a living being before eating the rest.  If it’s a gingerbread man it’s even more methodical.  It goes: head, arm, leg, arm, leg.  Yes, I torture my holiday treats. 
I love eating way too much Kraft Mac and Cheese – from the blue box.  And now that I’m an “adult” I can eat a whole half of a box and my mom can’t stop me! 
I carry a teenybopper sized torch for Zac Efron and Justin Bieber.  Thank God, they grow older each year too so the creepiness factor doesn’t increase the older I get…it just stays the same!
I get giddy every time TSwift comes out with a new album, hanging out the dirty laundry of all of Hollywood’s hunks. Oh Jake, Jake, Jake.  She got you good this time.  Deciphering which song is about whom is to little girls what crosswords are to old people.

But you know what else floats my boat?  
Muddy Buddies.
Those peanut buttery...
                                      choc-o-chocolatey...
                                                                        cereal-y covered goodness.
Anytime I see them, I'm instantly taken back to my childhood.  My strongest memories?  That we hardly ever made them because the adults deemed them "too messy" and that even one small morsel would instantly send me into a state of ravenous hunger.  There was never enough. 
So when I saw recipes going around for a cookie version of these...
Well, they had me at "hello."

Only, I discovered some issues:
1) People were using either peanut butter cookie mix, from a package, or a recipe that called for flour.  
    Um, if we want legitimate peanut butter flavor, we definitely have to go flourless.
2) And none, get this, none called for Chex cereal.  I'm sorry, but isn't that like the main ingredient in 
     a Muddy Buddy?  I mean if we're talking ratios, Chex is pretty vital.
So I made them.  
And I made them right.  
And guess what?  They were fantastic.
Muddy Buddy Cookies

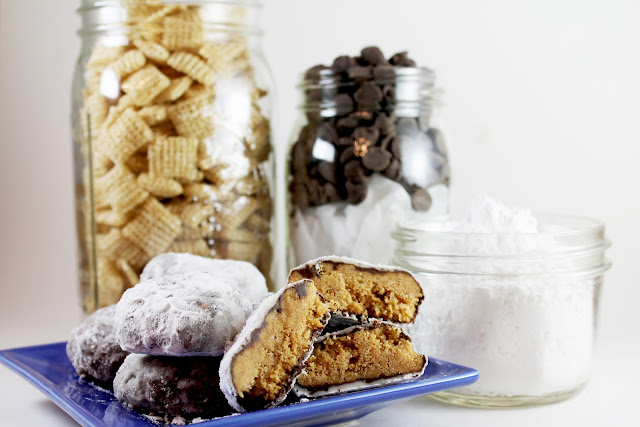
Flourless Peanut Butter Cookies with Chex Cereal
  • 1 Cup of Peanut Butter
  • 1 Cup of Sugar
  • 1 Egg
  • 1/2 tsp of Baking Soda
  • 1 tsp Vanilla
  • 1 cup Rice Chex Cereal (or Wheat/Corn)
  • Pinch of Salt for sprinkling
Coating
  • 1 Cup Chocolate Chips
  • 1/4 Cup of Butter
  • Approx. 1 Cup Powdered Sugar
Preheat oven to 350F
Bake for 9 minutes
Makes approximately 32 small cookies

For the cookies:

1) In a large bowl mix together peanut butter, sugar, egg, baking soda and vanilla.  Beat until well 
    blended.  Mixture will be crumbly. 
*Tip: If you spray the measuring cup with olive oil/cooking spray before measuring anything really sticky or gooey...like, just for arguments sake, say, peanut butter...then you will find that most of it slides right out and clean up is a breeze.  That's what my measuring cup looked like right after plopping the PB out of it.  No spatula, no scraping.
2) Lightly crush the Chex cereal into the PB mixture.  I just used my hand.  Using a hand beater
    blend until well combined.
3) Carefully fashion small (think teaspoon sized) peanut butter balls and place about an inch apart on a
    greased baking sheet. Dough will be very crumbly so getting a tight wad of is a little
    laborious, but doable.  Also, remember to think small.  You are going to be dipping these and
    shaking them up in a bag.  I feel like "smaller" can take more abuse.
4) Press balls of dough lightly with a fork.  Cross and press again.  Sprinkle lightly with salt. Bake for 9
    minutes in the oven until cookies are slightly golden.
5) Let cookies cool thoroughly before proceeding.
For the coating:
6) Melt chocolate chips and butter in a microwave safe bowl.  Start with 30 seconds and then stir. Heat
    in 15 second increments until smooth and melted.

7) Place cookies lightly, one at a time, into the bowl of chocolate. Using spoons to maneuver the cookie
    flip it over and coat any exposed areas.
8) Scrape as much excess chocolate off as you can. It's a messy process so don't freak out if it's not  
    perfect.
9) In a ziploc bag (quart or gallon size) add about a 1/2 cup of powdered sugar.  Start loading up the
    bag with the chocolate coated cookies.  Fill the bag with as many cookies as will fit comfortably, but
    still have some room to move around.  Close bag and shake. Make sure each cookie is thoroughly
    coated in powdered sugar.  They will be easily manageable and not sticky if coated properly.  Add
    more powdered sugar to bag as needed.  Repeat until all cookies are finished.
10) Store any uneaten cookies (if there are any) in the fridge.
The Bestie begged me to make these again for her birthday.

Ya, that's not till next June.  Can we say clingy
That's how good they are. 
---
And I've been meaning to post a picture of my super cool photo set up.  
So I present to you my homemade lightbox:
Bringing you awesome pictures from my counter.


-----
This was featured here: