Thursday, February 7, 2013

Behind The Blog: Bloggity Blog Redesign

I don't know why I call this my "Bloggity Blog."

I just do.

Whenever I save a file or photo for this here blog - "bloggity" is usually somewhere in the title.

I guess that's kind of what I do.

Morph proper names like "Nat's Adventures In Baking" into nonsensical non-names.

It's how my cat became:

Booger
Boosh
Boosher
Boo Bear
or Little Bast@#%...oh, that's not a nice one.

I wonder if he knows his name is Archie?


While I have a real food review post coming up soon, I'm pretty busy working for the next couple weeks so I won't have time for a more detailed post until this weekend.

What better time to give you a tour around the new design, huh?


I've been using the "Dynamic" view in Blogger ever since they first introduced it.

For a complete and utter beginner, it's great because it instantly gives your blog a facelift - no brains involved.

However, I always had issues with it looking different on every computer and not being user friendly.  

Finally, after two successful "test" blogs, I got up the guts to switch back to "Simple" view...and viola!  Here we are.

If you ever want to start a blog, I suggest you never, ever go with the Dynamic View - as tempting as it may be.  Your blog layout may suffer for awhile, but you can build in Simple View one step at a time and it's infinitely more customizable.  

So now I introduce to you the new header and even newer - page bar!


Home Tab: Get the goods.  Here's where all the posts happen in a chain of the four most recently added.


Comments Section: At the end of each post.  What made you laugh?  What made you cry?  


About Me: For now it's just background on why I started this blog, but I'll add more to it bit by bit if I feel inspired. 


Recipe Index:  This is my favorite part!  I've wanted to do this forever.  Now you can find the recipe you need, when you need it.  First, I plucked out my favorites - the ones I'd make again - and put them at the top.  The rest are organized by type.  Maybe you'll find something that intrigues you.


Baking Basics: I also set aside a tab for all the baking 101's, the "how to's" if you will.  Once again finding what you need, when you need it.


Fav Blogs: Giving a shout out to the blogs I follow.  The ones that inspire me.  Hopefully you'll find one or two that spark your interest.


And now, for the Sidebar.

On the top half we have:

The Search Bar.  Looking for a recipe that uses graham crackers? Marshmallows?  Type it.  Find it.

The Follow By Email.  Can't remember to check back here every week?  Me either.  Just type in your email address. You'll get a verification email.  Click the link and you're all set.  You won't have to miss out on a post again.

The Popular Posts.  Here's a running log of the top 5 most popular posts.  So you can relive them over and over ...and over.


And the bottom half:

Blog Archive.  All posts listed by date.  Year, then month, then individual post.

Subscribe.  You can add N.A.I.B. to your RSS feed.  If you don't know what that means then you don't have it.  Basically, if you like all of your news, blogs, etc (anything that is regularly updated) all in one place then here you go.

Become a Follower.  Join the club and publicly declare your affiliation with my blog (-gity blog ;).  Every blog offers this, but in all honesty I've never seen any benefit in it, except that it makes me look good. (I'm popular!)

Translate.  In case you have all these international friends who would just love my blog.  Or you want to brush up on your Bulgarian.  It's amazing and scary how many languages you can translate this post into.  Dang, Google.  Taking over the world, one blog at a time. 

--

And that my friends concludes this session of "Nat's Bloggity Blog Tour."

Hope you like it!

And find it a whole lot easier to navigate

...plus a little prettier too.


Friday, February 1, 2013

Double Chocolate Cereal Cookies (★ ★ ★ ☆ ☆)


I don't know that I've ever related to a cookie more.

You see for the past month, I've been doing two people's jobs.  

Worn two (though similar) hats...
Tried to maintain the quality of my work along with the person's that I am covering for...
Dropping one to pick up the other...

And what does it result in?

Adequate performance.
Nothing crumbling to pieces.
Nothing amazingly praiseworthy.

Okay, enough of the business-y jargon,
Bascially, two people doing two jobs are better than one. 
And when thinking of how to describe these beauties, I couldn't help but notice the parallel.

These cookies, while salivating-ly gorgeous (am I right?!?), were trying too hard to be too many things to too many people.

And by no one's fault but my own.

It all started with a looming leftover box of Chex cereal from my Muddy Buddy Cookies.

Stupid Safeway, only had the ginormous box.
No one likes Chex that much.  
...it's not chocolate  
...there are no marshmallows  
...it's not chocolate 
...I didn't get the honey coated kind.  
...it's not...well, you know.              
[chocolate] couldn't help myself

Anyway, I bake too much to just throw stuff away.
Waste not, want not. 

So this remaining box of cereal just sat....for months...in my baking bin.
Until one fateful morning, when this morsel appeared in my inbox Chocolate Covered Cheerios.

How good do those sound????  And then the lightbulb  - *bling*

Chocolate covered Chex.
In a cookie.
A White Chocolate cookie.
With Chocolate Chips.

Ya, ya.  That sounds about right.
Only, it wasn't "about right."

It was "about" okay.

I was a little overzealous in my Chex adding.
Like, I just went for it.  
Waste not, want not remember?

And then my "white chocolate" batter just plain didn't work.
It should have dawned on me that this might be an issue when I couldn't find a recipe for white chocolate batter...anywhere...ever.  
I decided to melt white chocolate chips and add them to the batter.  

Easy, right?  

Only there is this interesting thing about chocolate chips - they don't like to be melted and runny...they like to be solid and together.  
So instead of white chocolate cookie dough, I had cookie dough with the tiniest, most minuscule white chocolate "flecks" splattered throughout.

I mean, these weren't terrible.
...But neither am I at juggling two jobs.

It's just, these weren't amazing...in fact, they were, dare I say, slightly disappointing.
...and well, I'm guessing you can fill in how I feel about the "job" part in this equation. 

So even though I'm about to spend a good chunk of time typing out the recipe below...I can't, in good conscience, rave and recommend making these.  At least, not without some tweaks.  

Like maybe only putting a cup of crunchy cereal...you know, instead of three.

And if that doesn't appeal to you - there are pictures.
Double Chocolate Cereal Cookies
[i.e. White Chocolate Cookie Dough, Chocolate Drizzled Chex, White and Semi-Sweet Chocolate Chips]
adapted and inspired by The Better Crumb & Cookies and Cups

  • 1 Cup Chex Cereal
  • 1 1/2 Cup Semi-Sweet Chocolate Chips (Saving 1/2 Cup for later)
  • 2 1/2 Cups Flour
  • 1 tsp Salt
  • 1 tsp Baking Soda
  • 12 oz Bag White Chocolate Chips (Saving 1/2 Cup for later)
  • 1 Cup Butter
  • 1/2 Cup Packed Brown Sugar
  • 2 Eggs
  • 1 tsp Vanilla
Preheat Oven to 325F Degrees
Cook Time: 8-12 minutes
Makes Approximately 20 Cookies
How to Make Chocolate Drizzle
1) Melt 1 Cup of Chocolate Chips in a microwave safe bowl, or a double boiler.  Let cool to almost
    room temperature. (The chocolate will be very hot and may burn you or melt the plastic bag we are
    going to place it in).
2) Once cooled, place melted chocolate into a ziploc bag.
TIP: I like to flip the bag inside out, pile the chocolate on the "inside" part of the bag, then flip it back
         right-ways in.
3) Just slip your hand into the middle of the bag while inside-out, cradle the chocolate with your hand
    and carefully pull the sides of the bag around it until the chocolate is now on the inside.  I do this to
    help keep the chocolate in one general area instead of sloppily spooned all over the bag.
4) Press all of the chocolate into one corner, twisting the top of the bag until a little "triangle" of
    chocolate is formed and packed.  Cut the tip of the corner with some scissors.  The smaller the
    opening the smaller the drizzle lines.
[NOTE]: After making these cookies, I found this "drizzle" step to be obsolete as the Chex just gets
               crumbled all to heck in the batter.  I'd skip this and save a good chunk of time.  Crushed
               Chex with white and semi-sweet chocolate chips is "chocolate covered" enough for me.  If  
               however, you want to take the time to hand dip each and every one...then more power to
               you.  Or, you can throw the Chex into a bowl with the melted chocolate and get them
               covered that way.  I recommend either of these options to the "drizzle."
5) If continuing on with the Chex drizzle: Lay out Chex flat on a baking sheet lined with parchment
    paper.  Drizzle chocolate over the tops.  Place in the fridge until chocolate sets and is firm to the
    touch.
6) In the meantime, you can start making the batter.  In a medium sized bowl, mix together flour, salt
    baking soda. Stir and set aside.
7) In a microwave safe bowl or double boiler melt white chocolate (set aside 1/2 cup of the chips for
    later). Let melted chocolate cool to almost room temperature. (We will be adding the butter next and
    we don't want it to melt).
8) Add cooled (but still melted) white chocolate to a medium sized bowl.  Add butter, cut into cubes.
    (This recipe doesn't call for softened butter so in order for it to mix well, it needs to be cut to a more
    manageable size).  Beat until combined and smooth.
9)   Add brown sugar, and combine.  
10) Next beat in the eggs, one at a time.
11) Add vanilla.  Next, add dry flour mixture a little bit at a time until thoroughly combined.
12) Here is where you add the Chex, and remaining 1/2 of white and semi-sweet chocolate chips that 
      you set aside.  I suggest adding the Chex 1st if you'd like them to be in smaller pieces, and 2nd if 
      you'd like them to be a little larger.  I added my 1st so I still had to add the chocolate chips.  By 
      the time I was done adding and mixing, I couldn't even see the Chex pieces anymore.  
13) Ideally, any batter will be chilled overnight, but if you don't have time it's not required here.  Place 
      heaping teaspoonfuls on a greased baking sheet and cook until "just done" - about 8-12 minutes. 
      Slightly golden and puffed, but not thoroughly set.  They will continue to cook on the baking sheet.  
      Leave on the sheet for 5 minutes before moving to a cooling rack 
TIP: If you want to make these larger, you can.  I did for these pictures - and I liked them better that 
        way.  You will just have to adjust the time accordingly.  Also, because of the Chex, these cookies 
        don't spread well in baking, so you want to slightly flatten them out before baking - especially the 
        larger cookies.
Sure these "goodie goodies" didn't quite live up to their expectations,
But, in this case, I have to say:
Some cookies
Are better than none cookies at all.


Thursday, January 24, 2013

Honey Ricotta Stuffed Figs (★ ★ ★ ☆ ☆)

Inspiration can strike at any moment.

And when it does you have to be ready to just take it - and run.  

Why?  

Because if you don't, you can miss out on baking things like Honey Ricotta Stuffed Figs.  

Actually, let me raise the stakes a little bit...

If you don't, you can miss out on creating things like Nat's Adventures In Baking.  

I don't really remember what inspired me to finally sit down and open a blogger account.

I've always loved to bake.  
Instead of waking up early on Saturday mornings to watch cartoons, I'd be making muffins and bothering my poor mother while she tried to get her well-deserved eight hours of sleep.

They weren't always good...or ever...for that matter, but I still loved it.  And to this day, I blame the recipe, not my ten-year-old lack of skills.

Flash forward to 2010.
I'm pretty sure it was Bestie who finally convinced me to do it. 

Chronicle my baking escapades?  Alright.  Why not?

What I wanted was "Adventures In Baking."  
But some over-excited blogger had already scooped up that name.
I say over-excited, because now their site is about...not baking...and goes by a different title.  Way to hog the goods there guys, thanks.

But that's besides the point, what's actually important is the fact that I ended up adding my nickname "Nat."

I had never once...until that moment...referred to myself as anything other than my legal name, Natalie.

Not Natty.
Or Noodles.
Or Nanny.

Or, the one that seems to follow me wherever I go...Nat. 

But for some reason, at that moment, when blogger asked me a most poignant question: 
"what. is. your. blog. name?" 
I added "Nat."

At first, it was just my way of saying "nah, nah. nah, nah, nah!" I still get my title!  But eventually, I realized that Nat's Adventures In Baking is a whole heck of a lot better than plain ol' boring Adventures In Baking

There is a real person behind this blog.  She likes to get flour and egg caked on her clothes, (Man, I should really wear an apron more often), complain about "other people's" mess ups, and spend hours adjusting the white balance and such in her photos.   

What better way to convey that, than to announce it from the rooftops?
Inspiration is a funny fellow.

If it wasn't, then I wouldn't have ended up at an organic creamery, in downtown Santa Cruz, downing a cone full of Fig and Ricotta ice cream, in the pouring rain.

Rain + Ice Cream.
Who does that?!  
It was the figs and ricotta.  They made me do it.  Beckoning me.  Luring me in with their siren song.

Although it was not there to cause me harm.

It was good.
Too good.
So good, that it led to this.

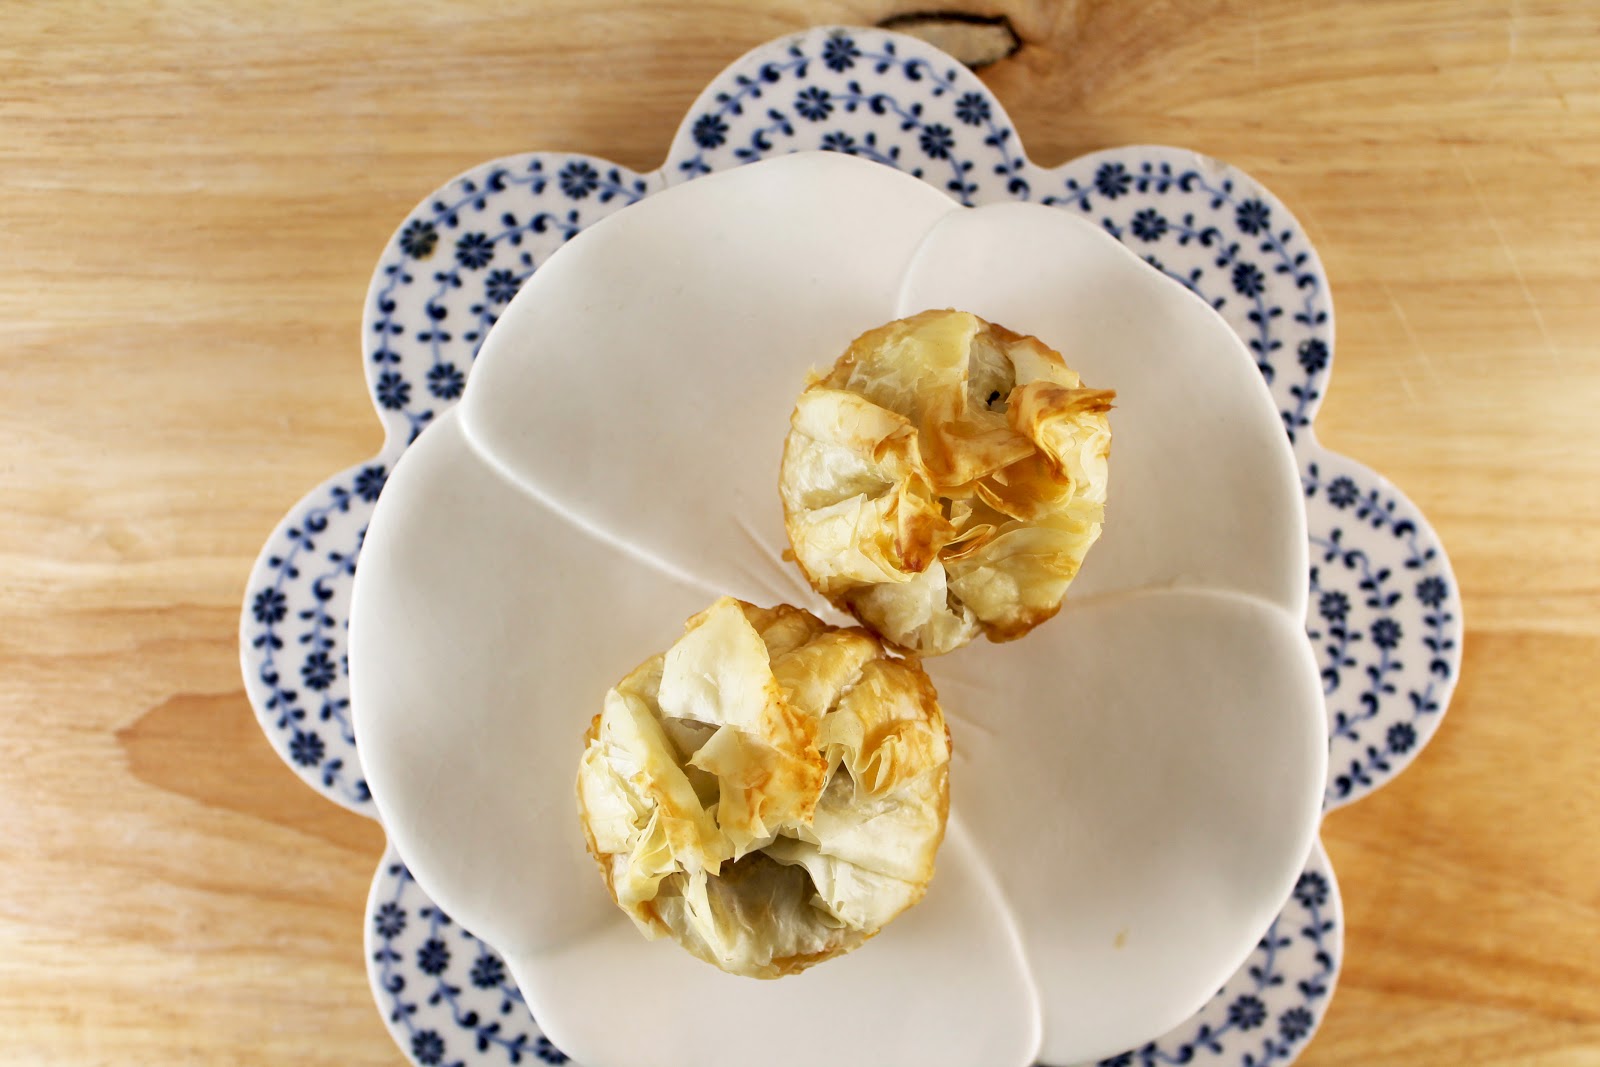
Dried figs, stuffed with honey-sweetened ricotta cheese, wrapped in honey-drizzled phyllo dough.

These are good too, but not as good as that ice cream.
So, like, when's summer?  Cause I have a two ingredient ice cream to make.  a.s.a.p. 
Honey Ricotta Stuffed Figs
  • 16 Dried Whole Figs
  • 1 Cup Ricotta Cheese
  • 2 Tbsp Honey (more or less to taste)
  • 1 Package Phyllo Dough (found in the freezer section)
  • 1/2 Stick of Butter, Melted


Makes 16 Servings (can easily be adjusted to fit your needs)
Preheat Oven to 325F
1) Unfortunately figs are out of season in January, or I might have tried fresh ones (yum!!) or at least
    have been able to pick up a better batch of dried ones.  I found these at a local produce store,
    although I have also seen some at Costco and Trader Joe's (packaged in a bag, rather than a disk).
    The whole point, though, is to have something big enough to cut open and stuff with cheese.
2) Phyllo dough is slightly temperamental, although not as difficult to work with as you may have read. 
    I came into this post knowing absolutely nothing about this stuff and I survived, so you can do it.  I'm 
    going to create a post just on this sometime in the future.  The basics of what you need to know are:  
    a) It's frozen, so it will need to be thawed overnight in the fridge,
    b) It dries out fast, so you need to have everything else ready to go before you start working with it, 
    c) You need to moisten the layers with butter so they don't crack and fall apart, 
    d) You can refreeze anything you don't use. 
3) Cheese stuffing. To be honest, I didn't really measure this out.  It was about 1 Cup of ricotta cheese 
    to 2 Tbsp of honey.  But you may need more or less depending on your taste preferences.  If you 
    start small, you can't mess up.  Just add more as needed.  Stir to combine and set aside.  
4) Fig Time! Arrange each fig so it is full size (in my package they were flattened to save space). 
5) You'll notice there are two ends: a "flat" and a "pointy." Take some kitchen scissors (normal,
    thoroughly washed, scissors work fine) and snip off just the tip of the pointy end. 
6) Now cut the fig down the center leaving the flat end intact.  In other words, don't cut all the way 
    through.  We want the fig to remain in one piece.
7) Adjust the fig so you can cut across the opposite center to create a sort of "X" shape (pictured bottom 
    right corner).  Repeat till all figs are prepared.
8) In a microwave safe bowl, melt butter.  The next step is the dough, so everything needs to be set 
    and ready.
9) Unwrap thawed out phyllo dough.  (FYI, it still needs to be chilled thaw and store in the fridge).  
    Grab 4 layers and wrap the rest back in the package.  You may need more, but since it dries out you
    can only work with one set at a time.  Depending on how large your sheets are, you'll want to cut
    them into approximately 4"x4" squares.  Size doesn't have to be precise, just a reference.  Once you
    do it a few times you'll see if they need to be bigger or smaller.  *Note: You will be working with the
    4 layers together on top of each other, so even though there are "layers" you'll technically only be
    cutting one piece/sheet.
10) Lift the top two layers off the square piece, and with a pastry/basting brush cover the remaining 
      layers in butter.  Place the top layers diagonally over the bottom half and brush these with butter as 
      well.  (The more butter, the more delicious.  I didn't use too much here though.  I kept it light).
11) With a teaspoon, spoon as much of the ricotta mixture into a fig as will fit.
12) Place fig on the prepared phyllo dough square.  
13) Pinch and lift edges of dough around the fig and apply pressure to the top to close. 
14) In a well greased mini-muffin pan (or a flat baking sheet) place figs one by one and the brush tops 
      with butter.  
15) After all of the figs have been stuffed and wrapped, drizzle tops with honey.  Again, here it's to 
      taste.  The more you use, the more sweet and moist (less crispy) the dough will be. 
16) Optional - dust the tops with a sprinkling of salt to help bring out the flavors.
17) If using a mini muffin tin, fill any empty slots with a small amount of water.  This helps the pan to 
      heat evenly.
18) Cover lightly with foil.  I did this so the tops wouldn't brown too quickly or burn in certain areas. 
19) Cook at 325F for 15-20 minutes or until golden brown.  
20) Serve warm.  Leftovers can be stored in the fridge. 
What will inspiration think of next?

-----


Well, how about a Facebook page?
Never miss a post again!  Plus, get extra "baking tidbits."
Like? Uh, yes please!!


------


Friday, January 11, 2013

Baking Basics: Measuring Liquids Vs. Solids


So today is the beginning of a new segment for me.


Let's see...

We've had:

Fails - Infamous mishaps.

Food Reviews - Witty wisdom (criticism?).

Face Offs - Overzealous endeavors.


Your standard post with (★ ★ ★ ★ ☆) - The goods.

And now, drum roll please......dddddrrrrrrrrrrrrrrrrrrrrrrrrrrrr...

Baking Basics!!  - The brains.


Kind of spoiled the surprise with the title there, though, huh?
That's okay, because I'm pretty excited.


Now, this, in no way, means that I think I know everything there is to know about baking and therefore am the single-most-credible source for all of your baking needs. In fact, if you want pure credibility for "measuring liquids and solids" here you go: Food Service Warehouse.

But there are no pictures.

Sometimes I have to see something in order to do it.  To have something broken down step-by-by. At the very least...it helps.

So that, ladies and gentlemen, is why I am starting this segment.


For you.

Because you can bake too.

Maybe you already know how to properly measure flour, but you've never been able to successfully caramelize sugar (trust me, it took me FOR-E-VER.  Tons of sugars and two torches later, I think I'm getting the hang of it).

All of this stuff and more is going to get covered right here.

And since a picture is worth a thousand words, we are both going to get a break from the overabundance of language normally present in my posts.

I have already compiled a lineup of things I would like to cover, but if you have any suggestions or questions feel free to send them my way via the comment section at the bottom of each post.

And so commences another N.A.I.B. Chapter.

-----

How to Properly Measure Liquids and Solids

What you'll need:
  • Set of "dry" measuring cups (1 cup, 1/2 cup, 1/3 cup, 1/4 cup)
  • Set of "wet/dry" measure spoons (1 tbsp, 1/2 tbsp, 1 tsp, 1/2 tsp, 1/4 tsp)
  • A "liquid" measuring cup (standard size measures up to 2 cups)
Tip: Because measuring often results in spills and messes, it is always prudent to measure over the sink,
       counter, etc.  Somewhere besides over the bowl you are using to mix ingredients.  Can't ever take
       back that Tbsp of Vanilla, that was supposed to be a tsp.

The Spoon and Level Method - Dry Ingredients (Large Amounts)


1) When measuring dry ingredients, especially "airy" ones, like flour and powdered sugar you want to 
     make sure not to pack them down.  This removes the air and disturbs the texture.  So you do not 
     want to just dig the cup into a bag and scoop up the amount you need. 


2) To properly measure, you want to scoop the ingredient spoonful, by spoonful, into the measuring
    cup.

3) Keep piling the spoonfuls in, until a small mound begins to form over the top.  


4) With the flat edge of a knife, cut through the mound a few times to make sure that the entire cup is 
     full and there are no missing gaps. 

5) Then, with the same flat side of the knife, slide it across the mouth of the measuring cup.


6) Presto, chango you have properly measured your first dry ingredient.  Not too little, not too much, 
     just the perfect amount.  


The Spoon and Level Method - Dry Ingredients (Small Amounts)
1) The same concept applies here.  Albeit on a smaller scale.  We don't want to shove as much as we possibly can into the spoon.  We want to keep the texture of the ingredient.  If the ingredient is packed, i.e. baking soda/powder, scrape around to get enough loosened up before measuring. 


2)  Here because we can't "spoon" something into a spoon, we are just going to scoop up a heaping 
     amount.


3) Tap the top of the spoon with the flat side of a knife.  Then slide across to create a level amount. 

4) Dry ingredient measuring? Done!  


Oh wait, there is one exception.  Brown Sugar.

The Brown Sugar Exception - Packing

1) Brown sugar is basically sugar with molasses, so I guess it's not really a 100% dry ingredient.  Hence 
    the measuring exception.  


2) Here you want to pack it all in.  Pat it down.  Stand on it.  Whatever you need to do.  Go ahead        
    and cram as much sugar as you can into that measuring cup or spoon.  


3) Stop adding when the sugar is level with the top. 

4) When you dump the sugar out, it should slide out in one firm clump.  The molasses makes it slightly 
     sticky, thus, it adheres to itself.  *Now there is even exceptions to exceptions.  This is the "general" 
     rule for brown sugar, however, there are recipes that specifically call for "unpacked" brown sugar.  
     In this case, you would measure the sugar the way you would any other dry ingredient, by spooning 
     and leveling. 


The Eye Level Method - Wet Ingredients (Large Amounts)

1) To measure liquids, you need a measuring cup specifically for liquids (pictured above).  Using the
    cups for dry ingredients will not produce the correct results.  This is for larger quantities.  Small
    quantities (i.e. tsp) can be measured in standard measuring spoons.

2) Basically, the correct measurement is the one you see at eye level.  Place the cup on a flat surface,
    bend down, and take the reading.  Add or subtract as needed.  (Picture above: At eye level, amount
    reads 1 Cup - correct)


3) Taking the reading from above or below eye level will give you an incorrect reading and you may be 
     adding too much or too little to your recipe.  (Picture above: Above eye level, that same amount is 
     reading as slightly more than 1 Cup - incorrect)


4) (Picture above - Below eye level, 1 Cup of water reads as slightly less - incorrect).


The Bulbous Method - Wet Ingredients (Small Amounts)


1) Unlike for larger measurements, measuring spoons can be used interchangeably between liquids and 
    solids.

2) For small amounts, you want to measure until just before the "spilling point."  For fattier liquids there 
    might be a dome or "bulb" that remains intact just above the top of the spoon. 


3) For other liquids, trying keep this "bulb" of liquid will just result in spilling.  In either case, measure until at least level and add to the rest of your ingredients.  


And now you are an accomplished measurer!