Showing posts with label whipped cream. Show all posts

Thursday, December 5, 2013

Cranberry Panna Cotta (★ ★ ★ ★ ☆)

Sometimes when you go to Italy you don't lounge around Lake Como sipping an endless supply of cappuccinos.  

It's true!

And sometimes you don't even get to enjoy the gorgeous villa you are staying in.  
Instead, when you go to Italy, a store clerk might give you dirty looks because you buy up their entire supply of milk chocolate Novi bars.  Yep, all. thirty.

Or you may offend a Pizzeria owner when someone thinks drugs are an appropriate dinner topic. Oh, yes, they do understand English.  They all understand English. 

You may find that a member of your family is contaminating the crisp Mediterranean air with his ...er... "their" incessant coughing.

And if those aren't surprising enough, Italian vacations sometimes involve getting lost in Milan.  Because your dad may shove half of your group in a cab, tell the driver "Duomo," and let them whisk you away. Wait! Du o mo, wha??  Is that a painting?  A piazza?  A deep fried sandwich?  
But guess what?

Italian vacations don't have to be filled with villas and cappuccinos and blissful relaxation.

I mean, that doesn't sound terrible...  but...

maybe if I was basking in the lake-side air, I wouldn't've been forced to order an entire dinner in Italian by one very flirtatious waiter.  Blush much? 

I could have missed out on the adventure that led us to knocking on doors and tracking down the house my great-grandma grew up in.

And I probably wouldn't have been enticed by the little home-based pizzeria tucked away in the hills of Tremezzo,

where I ate an Apple and Gorgonzola Pizza.  
and Panna Cotta,
made by a little Italian lady.  

...an Italian lady who inspired this post. 

Panna Cotta is basically the Italian version of Flan and Creme Brûlée.

A little less luxurious than the French,
And a little less "jello-y" than the Spanish,
Panna Cotta is a perfect medium between the two.

A balance of rich creaminess and refreshing texture, Panna Cotta is ridiculously easy to make anytime of year.

Smear it with some cranberry compote...and you're ready to ring in the holidays!
Cranberry Panna Cotta
recipes from David Lebovitz and Martha Stewart

Panna Cotta:
  • 4 Cups (1 Quart) of Heavy Whipping Cream
  • 1/2 Cup Sugar 
  • 2 tsp of Vanilla  
  • 2 Envelopes of Unflavored Gelatin 
  • 6 Tbsp of Cold Water

Cranberry Compote:
  • 1 - 12 oz Bag of Whole Cranberries
  • 1 Cup of Water
  • 2 Cups of Sugar

**Requires 4-6 hours of refrigeration.  Preferably overnight.**
Makes 8 Servings/Ramekins/Glasses
For Panna Cotta
1) Heat heavy whipping cream and sugar in a large saucepan over medium heat until sugar is dissolved.
2) Once cream and sugar are warmed and mixed together add vanilla.
3) In a separate, large, heat-resistant bowl, mix packets of gelatin along with the cold water. Let mixture
    set for about 5 minutes.  The gelatin will absorb the water and become like a thick paste.

4) Pour warm panna cotta mixture over thickened gelatin, and stir until gelatin is completely dissolved. 
5) Grease 8 ramekins/glasses/cups.
6) Divide panna cotta mixture evenly amongst the dishes. Chill the individual panna cotta's in the 
    refrigerator for 4-6 hours until firm (best if chilled overnight).
7) If you want to remove the panna cotta for serving, take a small sharp knife and run it along the edge 
    of the dish.  Place dish upside down on your serving plate and let it slide out.
For Cranberry Compote:
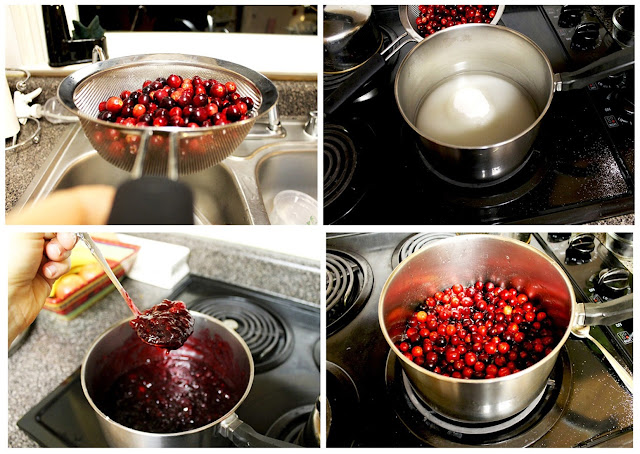
8) Rinse cranberries in cold water.
9) In a large saucepan, bring water and sugar to a slow boil.  Stir until sugar is dissolved
10) Add cranberries to the sugar mixture and bring to a boil.  Once cranberries reach a boil, reduce heat
      slightly and allow berries to simmer for 10 minutes, stirring regularly. The cranberries should "pop"
      and be soft to the touch.
11) Remove mixture from heat and allow to cool before serving.  Store in the refrigerator for up to two
      weeks in an air-tight container.
Sometimes trips to Italy are different than you expect,
But if they lead you to Panna Cotta then it's probably for the best.




Thursday, September 5, 2013

Orange Upside Down Cupcakes (★ ★ ★ ★ ☆)

But sadly, there were car fuzzies everywhere.

The End

---

Uh... ya....

This story is sort of a tragedy.  

So instead of just ending on a sad note, I thought I'd put the ending out there so you can brace yourself and not cry hysterically or anything like I did at the end of "500 Days of Summer."  

Yes, I know there was a disclaimer at the beginning of the movie!  That's what I get for blogging and movie-ing at the same time.  It took me 20 minutes to realize that the Bachelorette actually ended up with someone this season - I have a problem.

But not all was lost. I learned a lesson.

Remember that goody - "Pride cometh beforeth the falleth?"

Oh ya, we're going there.
And it's about to get good. 

As with many things in life - it all started with a "spark."

You see there was this cake - an orange cake.  It was getting ALL kinds of online love.  Features, comments, pins - you name it.  

It seemed like everywhere I went on the blogosphere that week - I was haunted by this orange cake.

The Cake From Where It All Began:

Now don't get me wrong - I'm a fan of orange and an even bigger fan of "easy," but I was dumbfounded to realize that what everybody was raving about was just so normal... so simple.

And that's the moment the dark seed took root.

"I can do that."

It became my presumptuous mission to become the toast of the blogs, the bees knees.  If an easy orange cake can do it...then I most definitely could.  

You guys like orange, right?  Obviously.  
And something that doesn't require frosting?  Boom - frosting on the ground!
Since I can't be a total copycat, instead of "simple" why don't we go with "classic?"  Upside down cake.
Then make it totes unique?  Mini-size 'em.

The stage was set.

The ingredients prepped. 

And honestly, I worked my magic.
These were good.  Like Martha Stewart Living, Better Homes and Garden, sophisticatedly-rustic-delicious good.   Even on Day 1, 2, and 3.

My evil plan was working.  Assuredly, my cupcakes would be the buzz of the week.

My friends and family drooled over them.  My brother who only eats my desserts if they are chocolate, begged for more.

Oh, I done good.

And that's when it happened...

I had carefully pack several away to bring to work.
Because the praises of family and friends can't be trusted.  They love me, you know?
But co-workers.  Co-workers have no obligation to boost my ego.  They can just as easily grab a cupcake, take a bite, and toss it in the trash.  No harm, no foul.

It was there that I would finally reign.  And my induction into the "Lauded Bakers of the Blogosphere" would be imminent.
That was before I was running late.

Before I couldn't find a container with a lid,

Before I had to slam on my brakes,

Before the treats I had so lovingly crafted, pummeled one by one to the floor...

...of my car.

My dreams crushed.
Replaced by smooshed cupcakes coated in car fuzzies.

-----

I learned a valuable lesson that day.

Baking isn't about winning praise.
It's about enjoying the process.

It isn't about sugar and butter.
Baking is about sharing and bringing people closer.

Oh, who am I kidding?  It totally is!

But I also know that giving way to the cockiness within -- always ends badly.  I'm just lucky this time my penance was pieces of carpet.
Orange Upside Down Cupcakes
used Sallys Baking Addiction as my starting point
  • 3 1/2 Cup Flour
  • 1 tsp Baking Powder
  • 1/2 tsp Baking soda
  • 1 Cup (2 Sticks) of Butter, melted
  • 2 Cups Brown Sugar
  • 2 Eggs
  • 1/2 Cup Plain Greek Yogurt (Or Sour Cream)
  • 3/4 Cup Milk
  • 1 Cup Orange Juice
  • 4 tsp Vanilla
  • 2/3 Cups Butter [for cupcake tops]
  • 1 Cup Brown Sugar [for cupcake tops]
  • 3-4 Small Oranges, cut into 24 thin slices and peeled
  • 24 Cupcake Liners
Makes 24 Cupcakes
Preheat Oven to 375F after baking for 7min lower to 350F
Bake for 15-20 minutes
1) In a small bowl, mix together flour, baking soda, and baking powder.
2) In a small microwave safe bowl, microwave 1 Cup (2 sticks) butter in 30 sec increments until melted. 
    Stirring in-between each heating.
3) Transfer melted butter into a medium sized bowl.  Add 2 Cups brown sugar and beat until combined.
4) Add eggs, yogurt, milk, orange juice, and vanilla.  Beat until combined.
5) Slowly add flour mixture to batter.  Once combined batter will be very thick.  Which makes it super
    easy to spoon into the cupcake tin. Yeah!
6) Because I needed the tops to slide out very easily, but I didn't want to have to eat these out of a 
    cupcake liner, I totally stole this idea from Glorious Treats.  Fold the liners in half and cut a small half 
    moon out of the bottom.  This will be just enough to cover the bottom of each of the muffin slots. 
7) Butter or spray the heck out off the muffin tin and then line with the cut cupcake liners.
8) In a small microwave bowl, melt 2/3 cups of butter and stir in 1 Cup brown sugar.
9) Drop in 1/2 Tbsp of this mixture into each liner.
10) Cut oranges into very thin slices - you need 24 total. 
11) I found that slicing the orange and then carefully peeling each one worked for me.  However, if
      you'd like to peel the whole orange first and then slice it that might work as long as you have a very
      sharp knife.
12) Next slit an opening in the slice, so you can easily wrap it into the bottom of a cupcake slot.  If you
      have more time cutting the slice into little "pie" pieces and placing them into the cupcake liner
      individually will make it easier to eat.
13) Press orange slice down so it gets immersed in the brown sugar and butter.
14) Spoon batter over orange slices and place into oven at 375F.  After 7 mins, lower the oven
      temperature to 350F.  Bake for another 8-13 minutes until a toothpick inserted in the center comes
      out clean.
15) Let cupcakes cool on a rack for a few minutes, then flip upside down and let cupcakes slide out.  If
      some seem stuck, carefully tap the tops of the cupcake tin to get them to fall out.
Vanilla Whipped Cream
makes enough for 24 cupcakes
  • 2 Cups of Heavy Whipping Cream
  • 2/3 Cup of Powdered Sugar
  • 2 Tbsp of Vanilla Bean Paste (or Vanilla Extract)
  • 2 tsp Unflavored Gelatin
1) Tip: But medium sized bowl in the freezer for about 10 minutes beforehand.  It helps the cream to 
    whip up faster. Side Note: the gelatin helps the whipped cream to keep it's form and not to become
    a runny, puddly mess. 
2) Beat whipped cream until stiff peaks form.  Add powdered sugar (more or less to taste), vanilla, and 
    gelatin.  Beat until combined.  
3) Store in fridge if not using immediately.

*Disclaimer* - While the events in this post are true, they may have been exaggerated for story telling purposes only.  I happen to really like orange in desserts and I get inspired by other blogs like twenty times a day! 


Thursday, June 6, 2013

Thai Tea Two Ingredient Ice Cream (★ ★ ★ ☆ ☆)

So "Phase One" of Rebuild Natalie's world is complete.

My Bestie is all moved and settled into the Coastal Land of the Hippies...more commonly known as Santa Cruz.  

And I've only been to visit her twice!  
She's been gone five whole days!  

That's pretty impressive considering we've seen each other practically every day since we decided to become BFF's three years ago.  

Yes, we literally just decided...like kids in kindergarten.  
And the rest is history!

I have to say, though, I knew I would miss her once she moved out, but I thought I'd miss our lamenting over the decline of "Smash" sessions or her incessant need to show me every. single. item of clothing she bought that day (yes, every. day.).  

So I was surprised that it hit me hardest at 6:30am, the morning after we moved her out.  
Because I am a morning grump!
I've spent the past ten months praying every morning that our paths wouldn't cross for at least a good half hour...or better yet - ever.

I know!  I sound horrible.
It's because I am!

I need the morning to adjust to being alive again. What am I doing?  Why am I here?  Do I really exist?
These are some of life's most difficult questions and I get asked them each and every morning.  
So ya, I'm not really excited to talk about how amazing it will be when we all have a chance to walk on the moon.  At this moment, I kinda want to blow up the moon.

But that morning, it hit me.  I would never inconveniently bump into her again.  Those weepy Dolly Parton serenades that used to aggravate me to no end, now sounded kind of sweet.

Don't get me wrong, I'm still not fully functional until 8am.  
It's been a few days and I think I've gotten the hang of this new routine.
So I think I'll stick with the memories for now. :)
One of my favorite memories, though - untainted by morning grumpiness - has to be the day Bestie introduced me to Thai Tea.

I had dragged her to a Salsa lesson at my University because I needed extra credits for my PE class, and I didn't want to go and face the swarms of creepy men who had no where else to be on a Friday night alone.

I realize now, that this was at the very, very beginning of our friendship because she wouldn't be caught dead going to a Salsa class now.  Oh, the things you'll do in the early stages of a relationship. (Like pretend you can tolerate 80's movies!)

Afterwards, we stopped by the resident college "Boba" shop and I ordered my usual blended coffee with pearls.  But Bestie.  She ordered this orange stuff.  And it changed my life.

Thai Iced Tea is slightly sweet, creamy, and a little spicy.  It's reminiscent of Chai, but has its own unique qualities.

At that moment, I was introduced to one of my new favorite foods.  Where had this drink been all my life???

Best friend?
Who needs a best friend when there is Thai Tea?
"Thai Tea" Two-Ingredient Ice Cream (Machine *Not* Needed)
Utilized Important Information from Use Real Butter

  • 3 Cups of Heavy Whipping Cream (set aside 1 cup)
  • 1/2 Cup Thai Tea Leaves (found at Asian food stores or here)
  • 1 Can (14 oz) Sweetened Condensed Milk

Needed:
-Strainer
-Airtight Storage Container
-Makes 8+ Servings
*Requires Cooking, Cooling, and Overnight Freezing Time*


So I know there are actually 3 ingredients, but the base to make plain ol' ice cream is just two ingredients.  Plus, no machine required!  Hello! Amazing. 
1) In a large saucepan, bring 2 cups of cream to a low boil.  
2) Immediately remove from heat and add in Thai Tea.  Stir until completely combined
    and let steep for 30 mins.


3) Place strainer over large bowl and pour tea mixture over it.  Try to press out any remaining liquid 
    to get a much of the tea infused milk as you can out of the leaves.  You'll notice you've lost a lot of 
    volume.  What was once runny and 2 cups is now thick and 1 cup. 
4) Let cream cool to just about room temperature, then let cool completely in the fridge (at least 2   
     hours).  I reused the cream container to store this mixture. 
5) 10-15 mins before starting the next step after the mixture has cooled, place large mixing bowl in  
     the freezer.  This will help the cream whip up faster.


6) Pour Thai Tea mixture along with the extra 1 cup of cream into the cold bowl.  Beat until fluffy and 
    no longer runny.  Stiff peaks should form. 
7) Once cream is whipped, fold in the sweetened condensed milk just until combined. 
8) Place mixture into a covered container (tupperware, etc.) and place in freezer.  Freeze overnight. 
    Scoop.  Enjoy!

Thoughts: This was good, but a little on the sweet side and the tea strength was a bit overpowering.  Next time I would definitely use less tea - probably only 1/3 Cup, and I would play around with the cream to condensed milk ratio.  

I was very skeptical about this whole "two-ingredient" fad when I decided to try it last summer.  I just couldn't believe that something so simple could actually become "ice cream."  But I have to say, it's pretty darn close.  If you want the real deal you've got to use a machine, but if you are looking for quick, simple, and easy this isn't a bad option at all. 

A word of warning though: because it's pure whipped cream and a whole lot of sweetened milk this type of ice cream is very intense and rich.  One scoop is usually plenty. 

Thai Tea is life-changingly delicious.
But I'll admit, it's no substitute for a cherished friend.
Throwing some Boba on top doesn't hurt though.


-----
This posted was featured on:


Friday, March 15, 2013

Deep Dark Chocolate Cupcakes {Rebake} w/Whipped Mascarpone Frosting (★ ★ ★ ★ ☆)

Some things are just not meant to be brought back.

Like...
Dinner, Circa 1950.

Sure, it was the golden age of domesticity, but what the heck were those housewives making?!

Vegetable and meat jello?

I'll be taking a rain check, thank you.
Stick me in a cryogenic freezer and ship me back to the land of deep fried oreos!

Or...
Village People's Y.M.C.A.

I know it's your wedding, but please, let's keep this macho-cheeseball of a song where it belongs. 
In 1978.
And...
Overalls!

Guys, overalls are coming back!  They're coming back???????!

This. is. a. travesty.

Of course, I'm guilty of wearing a pair or two everyday in the 90's.

But I was a kid!
I didn't know any better.

What I thought was the perfect solution to hiding my awkward teenage body was actually a fashion conspiracy to keep me looking like a large, lumpy sack of denim.

Why?
Because Junior High is about pain, people.

The truth of the matter is:
Everything comes around.

Everything.

Whether it looks exactly like it did before, is not the question.
The fact is...it's back.

Thankfully, for every terrible idea there is an equally wonderful one begging to be rediscovered.

Like jean jackets,

All forms of hair braids,

even "Sexy."


Oh, and these cupcakes.

I made these way back in the dark ages of this blog when I had no idea what I was doing.

I still don't really know what I'm doing, but at least now I'm organized about it.
Progress, people!

But even then, when everything was a complete mess, I still stumbled upon an amazing chocolate cake recipe.

We're talking I'm lookin' no further.  I'm plantin' my roots.  And unless someone asks me to try out their recipe because they guarantee that it is better, this is the chocolate cake I will be serving from here to kingdom come.


It's my chocolate cake "go-to."


The only problem was I hadn't made it since then.

That's the food blogger dilemma.  You find something amazing, but you can't ever make it again because you are supposed to be making "new" recipes, trying "new" things.

Well, you know what?

I'm breaking the rules.

Because this cake is too good to be forgotten.
...and mascarpone cheese is so absolutely divine, I needed it again too.

But in true blogger fashion, I've tweaked it.  (Don't shut me down, Google!)
Today, it's whipped!

See?  I'm still fit to be in the kitchen.
----------
I can't really explain this cake to you, other than it has the perfect balance of moist and denseness.
It's not too heavy, not too dry.  It's amazing.

Also, this frosting is very "whipped creamy."  Light and fluffy.  If you want something more solid, cut the cream in half.  Next time, I am going to do this.
----------

Deep Dark Chocolate Cake
copied from A Bloggable Life
  • 2 Cups of Sugar
  • 1 3/4 Cups of Flour
  • 3/4 Cup of Cocoa (Hershey's Special Dark, if you want this coloring)
  • 1 1/2 tsp Baking Powder
  • 1 1/2 tsp Baking Soda
  • 1 tsp Salt
  • 2 Large Eggs
  • 1 Cup Milk
  • 1/2 Cup Vegetable Oil
  • 2 tsp Vanilla
  • 1 Cup Boiling Water

Whipped Vanilla Mascarpone Frosting
adapted from Martha Stewart
  • 8oz Mascarpone Cheese, Room Temperature
  • 1 tsp Vanilla Paste (or Extract)
  • 1/2 Cup Granulated Sugar (more or less to taste)
  • 2 Cups of Heavy Cream
  • Stabilizer: Unflavored Gelatin/Cornstarch (I did not do this and my frosting did not hold for longer than 30 minutes)

Makes 24 Frosted Cupcakes
Preheat Oven to 375F Degrees then lower to 350F Degrees
Bake for 15-20 minutes
Needed Muffin Tin & Cupcake Liners

Cupcakes:
1) In a large bowl, add sugar, flour, cocoa, baking powder, baking soda, and salt.  Stir until combined.
2) Add eggs, milk, oil, and vanilla.  Beat for 2 minutes on medium speed. 
3) Mix in boiling water until combined.  Batter will be very thin and runny.  (See bottom righthand
    picture.  The batter doesn't even stick to the beaters).
4) Line muffin tin with cupcake liners.
5) Carefully pour batter into cups about 3/4 full.  I used a measuring cup to do this since the batter
    was so runny and I still managed to make a mess. 
6) Place pan into 375F Degree oven.  After 7 minutes lower oven temperature to 350F for the
    remaining 8-13 minutes.  Cupcakes are done when toothpick inserted into the center comes out
    clean.
7) Allow cupcakes to cool completely in the muffin tin before removing.

Frosting:
1) Place a medium sized bowl in the freezer to chill.
2) In another bowl, mix mascarpone, sugar, and vanilla until well combined.
3) Take bowl out of the freezer and beat heavy cream until stiff peaks form. This will take a few
    minutes so be patient (make sure you start with clean beaters for this!) {Here is where you would
    add your stabilizer...otherwise use immediately}
4) Fold cheese mixture into whipped cream.  I found this very difficult and ended up mixing with the
    beater very carefully and quickly.  Keep chilled.
5) Frost cupcakes and enjoy!

Blog police, you'll never get my pearls!


Thursday, August 23, 2012

Fluffernutter Brownie Batter Ice Cream (★ ★ ★ ☆ ☆)

The Odd Couple.

French Fries and Chocolate Milkshakes.

Peaches and a BBQ grill.

Skinny jeans and stilettos.  


What do all these things have in common?

Um, that they are flipping awesome together?!

Sometimes opposites can make the most compatible pairings.

I offer a poignant example:

I know these two people, you see.

One:                                                                              Two:
Has sophisticated taste in music.                                       Has no problem rocking out to the Beibs.
Needs their stories to be full of whimsy and fantasy.            Needs hard core character development.
Loves animals.                                                                 Likes their cat. (singular)
Is a creative genius.                                                         Is an professional organizer.
Extrovert                                                                         Introvert
Blonde (for today)                                                            Brunette (for years)
Tall                                                                                 Short

...Seriously, the list can go on.

One is my best friend, and Two is, well, me.  Notice I said "Best Friend" as in these two total opposites not only tolerate each other, but purposely spend hours upon hours together...like all the time.

Obviously, we have to have some things in common or our hang out sessions would be short lived.
Things like 60's fashion, The Walking Dead, and cupcakes help make up for the times we spend TWO hours trying to pick a movie. ("[Insert 80's Movie Suggestion here]." "Oh, I'm not really into the 80's." "Eighties?? :)" "Um, I said no." "80's!!!" "That's it. Molly Ringwald is going down!")

One thing we have always been able to agree upon is Peanut Butter.

How awesome is PB?  Am I right?!

Peanut Butter and Jelly.
Peanut Butter in a Milkshake.
Peanut Butter on a spoon.
Peanut Butter and...Marshmallow?

Two things I would have never thought to put together, yet the combination seems so....ordained.

How did I not know about this till like a year ago?????  What kind of childhood did I endure?  To not be introduced to the "Fluffernutter?" This is an utter travesty, I tell you.

So what is a peanut butter lover to do?

Whip up the most peanut buttery ice cream on the planet!  That's what.

Seriously, this two-ingredient ice cream is like the best thing ever!
....Add some marshmallow fluff to rectify childhood trauma,
....Top it off with leftover brownie batter for good measure,

And BOOM.

Earth shattering, I know.
Fluffernutter Brownie Batter Ice Cream
-1 can (14 oz) Sweetened Condensed Milk
-2 cups Heavy Whipping
-1/2 cup Peanut Butter
-1/2 cup Marshamallow Fluff
-Prepared Edible Brownie Batter:
       1/4 Box Brownie Mix
       2 Tbsp Butter
       1 Tbsp Water
       Mix together and roll into bite sized bits.


1) Place large mixing bowl in freezer.  (It helps when whipping the heavy cream).  While waiting for
    bowl to chill (approx. 10 min), in a medium sized mixing bowl beat 1/2 cup peanut butter and 1 can
    sweetened condensed milk until well blended.  *1/2 cup is a LOT of peanut butter.  Use 1/4 cup for
    a less overwhelming flavor.

2) After peanut butter and condensed milk are combined add in 1/2 cup marshmallow fluff.  Mix/beat
    till just combined.  Do not over mix.

3) Take large bowl out of freezer and beat 2 cups heavy cream till stiff peaks form.  Fold peanut butter
    mixture into whipped cream. Add brownie bits, folding till dispersed throughout.

4) Place mixture into a covered container (tupperware, etc.) and place in freezer.  Freeze overnight.
    Scoop.  Enjoy!

Tip: Keep a glass of milk handy.
Prepare to have your peanut butter lover socks knocked off.  


Photography provided to you by Travis Howland Photography


Featured June 2013:
Pin It Monday Hop I was Featured     


Thursday, August 2, 2012

Two Ingredient Ice Cream: Avocado Chip (★ ★ ★ ★ ☆)


You'll either hate me or love me.

Just to clarify, that's this weeks featured treat talking -- not me.  

I guess you can hate or love me.  But that seems a little rash doesn't it?
I mean, you don't even know me!!  Sniff....tear. 

Nope, this week I tried something a little out of the ordinary: Avocado Chip Ice Cream.


Now you understand my comment, huh?  


Honestly, I have never once made something that stirred up such controversy.  
This is recreational baking, right?  Not a debate on whether you should eat at Chick-fil-A or not.

People were legitimately offended. 

For fun I took a casual poll: Avocado Ice Cream?  Yes or No?

And I received every response from:

Um, yes please!

to

I'm writing Obama.  

Guys need to chill.  It's ice cream.  And pretty darn good ice cream at that.  


Put aside the avocado for one sec.  I want you to at least realize how amazing this whole two-ingredient ice cream is.  And if you need to put the avocado from your mind to do it...then please, I'll wait.

You good?

Okay.

This ice cream is so easy, anyone can do it: Heavy Whipping Cream + Sweetened Condensed Milk.  No machine required.  And to top it off, it is totally, completely, 100% customizable.  

Always loved PB&J?  
Have a thing for Dirty Chai Lattes?
Black licorice makes your heart flutter?
Boom.  Make it an ice cream.

Which brings us to the present.  So why avocado?

Basically, I like to try new things.  

I've seen this two ingredient recipe for ice cream floating around the blogosphere for awhile now and it wasn't until I saw this that I decided the time had come.  It seems avocado is the way to my heart.  Who knew, right?

I was a little skeptical about it actually having the consistency of ice cream, but it really does taste like the creamiest, most fattening ice cream you'll ever have.  *A tip: it freezes rock solid.  Leave it out for about 15 minutes before scooping.

As for the the flavor, my sister's bff said it best: "Sweet avocado is [at once] weird/delicious/disgusting/intriguing." Put that on a plaque, people.   

Although, I have to say.  It grows on you.  Pulls you in with just enough titillation, that by the end of 
the week you realized you have scooped your last scoop.  Ninja'd by a fatty fruit.


"Hey! Avocado Ice Cream,...

I misssssssssssss youuuuu!"

---

You've probably noticed the drastic improvement in my photo quality.

All credit goes to my friend Travis.  He's helping me set up a little blog "studio."
In the meantime, you'll be graced with his excellent photos.
Check him out at Travis Howland Photography and info@travishowland.com

Don't get too spoiled. :)

---


What awesome flavor would you dream up?


Thursday, June 21, 2012

Face Off: Chocolate Frosting

I'm not sure what possesses me to do things like this.  Things like deciding to fix stew and a homemade apple pie in the same night...all by myself.  Inevitably, my family doesn't eat until 10pm.

We're Italian.  Eating can't wait for 10pm!   

But I do these things all the time.  

Lofty ideas take root and germinate in my head till I can think of nothing else.  And by the time I've gathered all of the needed supplies, clear visions of the utter joy and praises my baking escapades will surely bring to all those around me further fuel the fire--my crazy.

I always forget about "the last time."  

The last time I told myself to "remember this feeling"...the fat-man-sitting-on-my-chest one.  
The last time I ended up crying on a ladder in the shower breathing in chemical fumes because the entire bathroom - even the ceiling - needed to be cleaned.  
Or the last time I felt like punching people in the face because I was working my butt off in the kitchen while everyone else was watching TV...Wha? Why do I need to "ask" for help?   

The ability to suppress.  To forget.  It's a little gift life gives you.  A chance to move on, to do other stressful, stupid stuff.

Like I did for this post.

---

Finding the best chocolate frosting is a noble goal...Whipping up six different recipes at the same time is an insane goal.  

Ice baths.  Endless dishes.  And sore arms for days.  

But I did it for you.

To settle this nonsense once and for all.  

Here are the contestants.  My raking, remarks, and recipes follow:
Raking: 6 of 6

Remarks: This is an interesting frosting.  It is reminiscent of a marshmallow.  Super sweet and has the texture of sticky meringue.  I actually am a HUGE fan of this frosting, but not in chocolate form.  Normally, it is a nice and interesting complement to the cupcake, but something just doesn't translate here.  

Recipe(s):


Ranking: 5 of 6

Remarks: This frosting was a ton of work...requiring three separate mixtures and waiting for things to cool. Not feeling the love here. This was definitely the most spreadable of the bunch, but it had a very strong butter flavor, which if you've read my Best Frosting Ever entry, you'll already know I'm not a fan of.  


Ranking: 4 of 6 (My Dad's Fav)

Remarks: Probably the fastest of all the recipes to complete.  It was sweet and the powder sugar flavor was very evident.  It had a nice, thick, and smooth texture.  I found I had to add more milk than was called for.  It could've been because I made only 1/3 of the recipe, but it was almost like fudge and difficult to spread.  My dad mentioned that he thought this frosting was more on the milk chocolate side of the spectrum.  He loves a good buttercream. 


--RUNNER UP--
Ranking: 3 of 6 (Brother-in-Law's Fav)

Remarks: This frosting is muy delicioso!  It's extremely similar to the Old Fashioned Chocolate Frosting (My fav, below).  Essentially, the only difference between the two is that this recipe uses powdered sugar instead of dissolved granulated sugar.  Powder sugar isn't my favorite flavor in a frosting, but in this recipe it is pretty subdued.  This one also held up much better after being refrigerated than the Old Fashioned one.  I'm sure it had to do with the sugars.  It hurt me to make this #3 on the list because it is just SO good, but someone has to make the final call and my ruling is that granulated sugar wins.  The queen has spoken!

Recipe: Anne's Perfect Chocolate Frosting

1 pkg (6oz) semisweet chocolate pieces
1/2 cup light cream
1 cup butter
2 1/2 cups unsifted confectioners' sugar

In medium-sized saucepan, combine chocolate pieces, cream and butter; stir over medium heat until smooth. Remove from heat. With whisk, blend in 2 1/2 cups confectioners' sugar. In bowl set over ice, beat until frosting holds its shape.


--RUNNER UP--
Ranking: 2 of 6 (My Fav)

Ranking: Oh my gracious.  This frosting is heaven.  It's not too sweet and a perfect mix of whipped cream and fudge.  How it achieves the balance of light and chocolatey goodness is beyond me.  The reason this baby couldn't take the prize for first?  It is time CONSUMING.  It took me 40 minutes to complete.  Ice bath, cooling, whipping, clean up....you name it.  Not sure the exorbitant amount of time is worth it--especially when the Chocolate Ganache (coming next) is almost as good.  As a side note, if you don't intend to use this frosting right away, it gets a little grainy because of the granulated sugar.  My dad told me he preferred Anne's Perfect Chocolate Frosting because of this.  It's really a preference thing when it comes down to choosing which of these two recipes to use.

Recipe: Old Fashioned Chocolate Frosting


--WINNER--
Ranking:  1 of 6  (Bestie's Fav, My Mom's Fav)

Remarks:  This is fantastically fluffy and had the purest chocolate flavor out of all the frostings I made.  It's not too sweet, but it's oh so rich.  My dad commented on the nice semi sweet/bitterness flavor.   And what puts it over the edge for top billing is that it is SUPER easy to make.  Only two ingredients.  After you finish cooking the frosting on the stove, you must actually get it cold for it to get fluffy/whipped.  The recipe says room temp, but I didn't find that to be the case.  And the cherry on top:  it says you can store at room temp!  Absolutely, awesome because frostings are never the same once they've been refrigerated.   


-----

Recap:
Chocolate Seven Minute Frosting: Skip.
Our Best Bites: Chocolate Frosting: Way too much work, not enough love.
Rich Chocolate Buttercream: Basically your typical buttercream.
Anne's Perfect Chocolate Cake Frosting: Powder Sugar.  So good.  Lots of work.
Old Fashioned Chocolate Frosting: Granulated Sugar.  So good.  Lots of work.
Chocolate Ganache: Two Ingredients.  Rich chocolate taste.  Winner, winner chicken dinner.

This probably isn't the most definitive list out there, but I like to tell myself it is.  Because then all this hard work actually meant something.  

And I can't afford to have any more "ideas" for awhile.